By default, a queue in ActiveMQ can be accessed without providing any credentials. However, in real world scenarios, you will have to deal with secured queues. So in this blog, I will explain how we can enable security for ActiveMQ and what configurations are required to be done in WSO2 ESB.
Pr-requisites - Enable the JMS transport for WSO2 ESB as explained in [1].
Step 1 - Secure the ActiveMQ instance with credentials.
To do this, add the below configuration to the activemq.xml under the <broker> tag and start the server.
<plugins>
<simpleAuthenticationPlugin anonymousAccessAllowed="true">
<users>
<authenticationUser username="system" password="system" groups="users,admins"/>
<authenticationUser username="admin" password="admin" groups="users,admins"/>
<authenticationUser username="user" password="user" groups="users"/>
<authenticationUser username="guest" password="guest" groups="guests"/>
</users>
</simpleAuthenticationPlugin>
</plugins>
Step 2 - Enable the JMS Listener configuration and configure it as shown below.
<!--Uncomment this and configure as appropriate for JMS transport support, after setting up your JMS environment (e.g. ActiveMQ)-->
<transportReceiver name="jms" class="org.apache.axis2.transport.jms.JMSListener">
<parameter name="myTopicConnectionFactory" locked="false">
<parameter name="java.naming.factory.initial" locked="false">org.apache.activemq.jndi.ActiveMQInitialContextFactory</parameter>
<parameter name="java.naming.provider.url" locked="false">tcp://localhost:61616</parameter>
<parameter name="java.naming.security.principal" locked="false">admin</parameter>
<parameter name="java.naming.security.credentials" locked="false">admin</parameter>
<parameter locked="false" name="transport.jms.UserName">admin</parameter>
<parameter locked="false" name="transport.jms.Password">admin</parameter>
<parameter name="transport.jms.ConnectionFactoryJNDIName" locked="false">TopicConnectionFactory</parameter>
<parameter name="transport.jms.ConnectionFactoryType" locked="false">topic</parameter>
</parameter>
<parameter name="myQueueConnectionFactory" locked="false">
<parameter name="java.naming.factory.initial" locked="false">org.apache.activemq.jndi.ActiveMQInitialContextFactory</parameter>
<parameter name="java.naming.provider.url" locked="false">tcp://localhost:61616</parameter>
<parameter name="java.naming.security.principal" locked="false">admin</parameter>
<parameter name="java.naming.security.credentials" locked="false">admin</parameter>
<parameter locked="false" name="transport.jms.UserName">admin</parameter>
<parameter locked="false" name="transport.jms.Password">admin</parameter>
<parameter name="transport.jms.ConnectionFactoryJNDIName" locked="false">QueueConnectionFactory</parameter>
<parameter name="transport.jms.ConnectionFactoryType" locked="false">queue</parameter>
</parameter>
<parameter name="default" locked="false">
<parameter name="java.naming.factory.initial" locked="false">org.apache.activemq.jndi.ActiveMQInitialContextFactory</parameter>
<parameter name="java.naming.provider.url" locked="false">tcp://localhost:61616</parameter>
<parameter name="java.naming.security.principal" locked="false">admin</parameter>
<parameter name="java.naming.security.credentials" locked="false">admin</parameter>
<parameter locked="false" name="transport.jms.UserName">admin</parameter>
<parameter locked="false" name="transport.jms.Password">admin</parameter>
<parameter name="transport.jms.ConnectionFactoryJNDIName" locked="false">QueueConnectionFactory</parameter>
<parameter name="transport.jms.ConnectionFactoryType" locked="false">queue</parameter>
</parameter>
</transportReceiver>
Step 3 - Create a Proxy service to listen to a JMS queue in ActiveMQ.
Once the ESB server is started, create the below Proxy service and let it listen to the queue generated in ActiveMQ.
<proxy name="StockQuoteProxy1" transports="jms" startOnLoad="true">
<target>
<endpoint>
<address uri="http://localhost:9000/services/SimpleStockQuoteService"/>
</endpoint>
<inSequence>
<property name="OUT_ONLY" value="true"/>
</inSequence>
<outSequence>
<send/>
</outSequence>
</target>
<publishWSDL uri="file:repository/samples/resources/proxy/sample_proxy_1.wsdl"/>
<parameter name="transport.jms.ContentType">
<rules>
<jmsProperty>contentType</jmsProperty>
<default>application/xml</default>
</rules>
</parameter>
</proxy>
Once the above proxy service is deployed, send a request to the queue and observe how the message is processed and send to the backend. You can use the sample available in [2] to test this scenario out.
If you are sending a JMS request you can use the username and the password in the URL as shown below.
ant stockquote -Dmode=placeorder -Dtrpurl="jms:/StockQuoteProxy1?transport.jms.DestinationType=queue&transport.jms.ContentTypeProperty=contentType&java.naming.provider.url=tcp://localhost:61616&java.naming.factory.initial=org.apache.activemq.jndi.ActiveMQInitialContextFactory&transport.jms.UserName="admin"&transport.jms.Password="admin"&transport.jms.ConnectionFactoryType=queue&transport.jms.ConnectionFactoryJNDIName=QueueConnectionFactory"
[1] - https://docs.wso2.com/display/ESB490/Configure+with+ActiveMQ
[2] - https://docs.wso2.com/display/ESB490/Sample+250%3A+Introduction+to+Switching+Transports
Tuesday, December 6, 2016

Friday, November 25, 2016
Disabling API Console/Swagger tools menu available from store console for anonymous/logged in users
If you need to disable the API Console/Swagger from the Store UI for anonymous users/logged in users, you can try out the below methods.
There is no straightforward configuration readily available with API Manager to do this. However, by doing a minor config change, this is possible. What you actually need to do is change the code of the block.jag which resides under wso2am-1.8.0/repository/deployment/server/jaggeryapps/store/site/blocks/api/api-info folder.
Method 1
Assuming you want the API Console (RESTClient) to be disable for anonymous users only, this can be done by changing/adding the below lines of code to the block.jag.
Step 1
Change the below code of line from
var showConsole=true;
to
var showConsole=false;
Step 2
Then add the below lines of code right after the line _var showConsole=false;_
if(user){
showConsole=true
}
Method 2
If you need this feature to be completely invisible for anonymous and logged in users, all you have to do is change the below code.
Change the parameter from
var showConsole=true;
to
var showConsole=false;
Once the above changes are done, restart the API manager server and you will notice that the RESTClient tool is visible only to logged in users/not visible at all for anyone.
There is no straightforward configuration readily available with API Manager to do this. However, by doing a minor config change, this is possible. What you actually need to do is change the code of the block.jag which resides under wso2am-1.8.0/repository/deployment/server/jaggeryapps/store/site/blocks/api/api-info folder.
Method 1
Assuming you want the API Console (RESTClient) to be disable for anonymous users only, this can be done by changing/adding the below lines of code to the block.jag.
Step 1
Change the below code of line from
var showConsole=true;
to
var showConsole=false;
Step 2
Then add the below lines of code right after the line _var showConsole=false;_
if(user){
showConsole=true
}
Method 2
If you need this feature to be completely invisible for anonymous and logged in users, all you have to do is change the below code.
Change the parameter from
var showConsole=true;
to
var showConsole=false;
Once the above changes are done, restart the API manager server and you will notice that the RESTClient tool is visible only to logged in users/not visible at all for anyone.
Wednesday, November 9, 2016
How to create custom references(usedBy, ownedBy, etc) that can be used to associate artifacts in WSO2 Governance Registry 5.3.0 onward
This support was available from G-Reg 5.3.0 onward. For more information, refer [1].
1. Added a new rxt with the below config.
<artifactType hasNamespace="true" iconSet="10" pluralLabel="Tests" shortName="tests"
singularLabel="Test" type="application/vnd.wso2-tests+xml">
<storagePath>/tests/@{details_name}</storagePath>
<nameAttribute>details_name</nameAttribute>
<namespaceAttribute>details_address</namespaceAttribute>
<ui>
<list>
<column name="Name">
<data href="@{storagePath}" type="path" value="details_name"/>
</column>
</list>
</ui>
<content>
<table name="Details">
<field required="true" type="text">
<name>Name</name>
</field>
<field required="true" type="text">
<name>Address</name>
</field>
<field required="true" type="text">
<name>ContactNumber1</name>
</field>
<field required="true" type="text">
<name>ContactNumber2</name>
</field>
</table>
</content>
</artifactType>
2. From the publisher, added a new artifact of type tests (I've added a test artifact by the name Test3)
3. Added the below config to the <G-REG_HOME</repository/conf/governance.xml file;
<tests reverseAssociation ="tests" iconClass="fw-globe">tests</tests>
so that the <Association type="soapservice"> looks like what's given below.
<Association type="soapservice">
<security reverseAssociation ="secures" iconClass="fw-security">policy</security>
<ownedBy reverseAssociation ="owns" iconClass="fw-user">soapservice,restservice,wsdl</ownedBy>
<usedBy reverseAssociation ="depends" iconClass="fw-globe">soapservice,restservice,wsdl</usedBy>
<depends reverseAssociation ="usedBy" iconClass="fw-store">soapservice,restservice,wsdl,endpoint</depends>
<contacts reverseAssociation ="refers" iconClass="fw-globe">contacts</contacts>
<tests reverseAssociation ="tests" iconClass="fw-globe">tests</tests>
</Association>
4. From the publisher, try to select the added test type artifact for your SOAP service. I typed in the name Test3 and it would list to be selected and added as an association for the SOAP Service.

Note that as mentioned in our documentation when doing the above, you need to add the values you defined as short name in the RXT file of the artifact, within the <Association type> element, to define the association types enabled for that particular asset type
[1] - https://docs.wso2.com/display/Governance520/Adding+Associations+for+an+Asset
1. Added a new rxt with the below config.
<artifactType hasNamespace="true" iconSet="10" pluralLabel="Tests" shortName="tests"
singularLabel="Test" type="application/vnd.wso2-tests+xml">
<storagePath>/tests/@{details_name}</storagePath>
<nameAttribute>details_name</nameAttribute>
<namespaceAttribute>details_address</namespaceAttribute>
<ui>
<list>
<column name="Name">
<data href="@{storagePath}" type="path" value="details_name"/>
</column>
</list>
</ui>
<content>
<table name="Details">
<field required="true" type="text">
<name>Name</name>
</field>
<field required="true" type="text">
<name>Address</name>
</field>
<field required="true" type="text">
<name>ContactNumber1</name>
</field>
<field required="true" type="text">
<name>ContactNumber2</name>
</field>
</table>
</content>
</artifactType>
2. From the publisher, added a new artifact of type tests (I've added a test artifact by the name Test3)
3. Added the below config to the <G-REG_HOME</repository/conf/governance.xml file;
<tests reverseAssociation ="tests" iconClass="fw-globe">tests</tests>
so that the <Association type="soapservice"> looks like what's given below.
<Association type="soapservice">
<security reverseAssociation ="secures" iconClass="fw-security">policy</security>
<ownedBy reverseAssociation ="owns" iconClass="fw-user">soapservice,restservice,wsdl</ownedBy>
<usedBy reverseAssociation ="depends" iconClass="fw-globe">soapservice,restservice,wsdl</usedBy>
<depends reverseAssociation ="usedBy" iconClass="fw-store">soapservice,restservice,wsdl,endpoint</depends>
<contacts reverseAssociation ="refers" iconClass="fw-globe">contacts</contacts>
<tests reverseAssociation ="tests" iconClass="fw-globe">tests</tests>
</Association>
4. From the publisher, try to select the added test type artifact for your SOAP service. I typed in the name Test3 and it would list to be selected and added as an association for the SOAP Service.
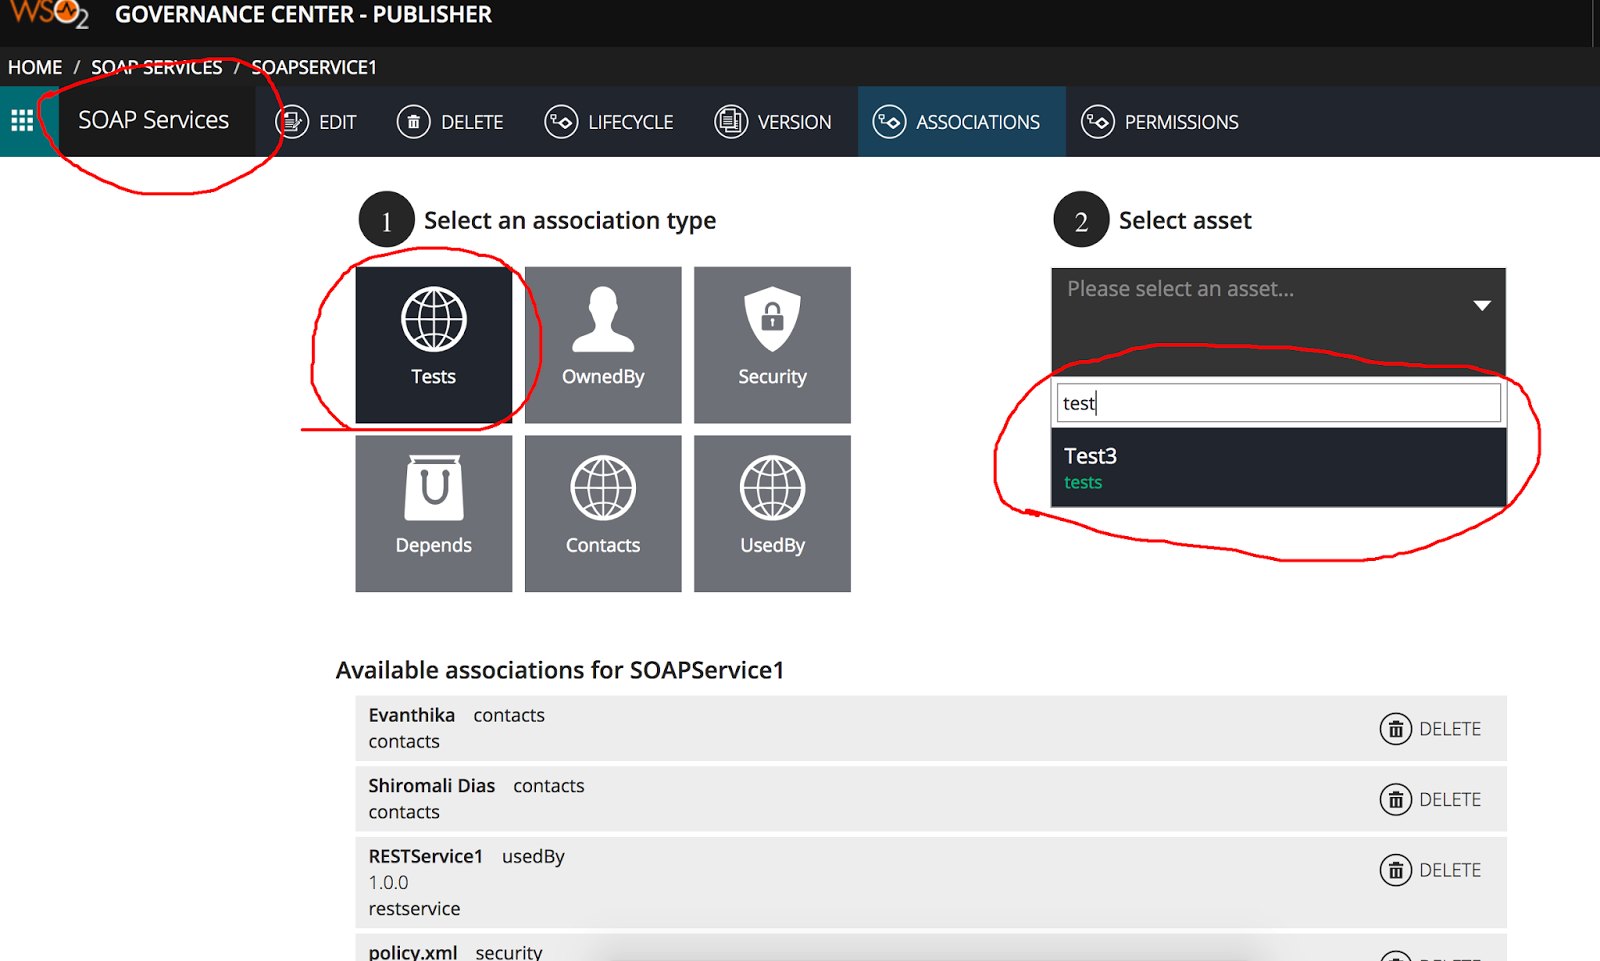
Note that as mentioned in our documentation when doing the above, you need to add the values you defined as short name in the RXT file of the artifact, within the <Association type> element, to define the association types enabled for that particular asset type
[1] - https://docs.wso2.com/display/Governance520/Adding+Associations+for+an+Asset
Tuesday, June 28, 2016
How to list admin services used by WSO2 carbon based servers
We are given admin services by WSO2 products to perform various tasks but there is no documentation on the list of the services that are being provided. Therefore to list all these admin services, all you have to do is start the server with -DosgiConsole and type in the command listAdminServices in the osgi console.
This is clearly explained in the stack overflow question at [1].
[1] - http://stackoverflow.com/questions/21219907/list-admin-services-used-by-wso2-carbon-based-servers
This is clearly explained in the stack overflow question at [1].
[1] - http://stackoverflow.com/questions/21219907/list-admin-services-used-by-wso2-carbon-based-servers
Monday, May 23, 2016
[WSO2 Governance Registry] - How to analyse the history of registry resources
Assume that you are working on a setup where you need to analyse the history of registry resources. One might want to know what type of operations have been done to the resource throughout it’s lifetime. This is possible from a simple DB query.
select * from REG_LOG where REG_PATH=‘resource_name’;
i.e. select * from REG_LOG where REG_PATH='/_system/governance/apimgt/statistics/ga-config.xml';
As an example, assume I want to find out the actions taken on the resource ga-config.xml. So when I query the table REG_LOG, below is the result I would receive.

When you look at the above result set, you would notice that the column REG_ACTION shows different values in each row. The actions that represents these values are configured in the class Activity.java. For example, REG_ACTION=10 means that the resource have been moved from it’s current location. REG_ACTION=7 means that it has been deleted from the system. Likewise, when you go through [1], you can find out the rest of the actions which you can take on these registry resources.
Therefore as explained above, by going through the REG_LOG of the registry database table, you can audit the actions taken on each and every resource.
[1] - https://github.com/wso2/carbon-kernel/blob/4.4.x/core/org.wso2.carbon.registry.api/src/main/java/org/wso2/carbon/registry/api/Activity.java
select * from REG_LOG where REG_PATH=‘resource_name’;
i.e. select * from REG_LOG where REG_PATH='/_system/governance/apimgt/statistics/ga-config.xml';
As an example, assume I want to find out the actions taken on the resource ga-config.xml. So when I query the table REG_LOG, below is the result I would receive.

When you look at the above result set, you would notice that the column REG_ACTION shows different values in each row. The actions that represents these values are configured in the class Activity.java. For example, REG_ACTION=10 means that the resource have been moved from it’s current location. REG_ACTION=7 means that it has been deleted from the system. Likewise, when you go through [1], you can find out the rest of the actions which you can take on these registry resources.
Therefore as explained above, by going through the REG_LOG of the registry database table, you can audit the actions taken on each and every resource.
[1] - https://github.com/wso2/carbon-kernel/blob/4.4.x/core/org.wso2.carbon.registry.api/src/main/java/org/wso2/carbon/registry/api/Activity.java
Friday, October 30, 2015
Working with PostgreSQL 9.3 & WSO2 products
As you all know, WSO2 products support a wide range of RDBMs. In this post, I will explain how you can install PostgreSQL 9.3 on your Linux machine and what commands you have to run to create users/databases and grant permission for databases etc. In the latter part of the post, I will briefly explain on the configuration that needs to be done to connect WSO2 products to a PostgreSQL database.
Installing PostgreSQLYou can install using the apt-get command on Linux as below.
Step 1 - To get information on the newest versions of packages and dependencies
sudo apt-get update
Step 2 - To install PostgreSQL v9.3
sudo apt-get install postgresql-9.3
Configure PostgreSQL password
To setup a password to login to PostgreSQL, issue the below commands.
sudo -u postgres psql template1
ALTER USER postgres with encrypted password 'postgres';
Note: To quit from the console, press Ctrl + D
Additional configuration for PostgreSQL
Step 1 - Configure md5 Authentication
1. Open the pg_hba.conf
sudo vim /etc/postgresql/9.3/main/pg_hba.conf
2. Find the below line
local all postgres
and change it to
local all postgres md5
Step 2 - Enable TCP/IP connections
1. Open the postgresql.conf file
sudo vim /etc/postgresql/9.3/main/postgresql.conf
2. Locate the line and uncomment it
#listen_addresses = 'localhost'
Creating a user, a database and then granting permission for the database.
Step 1 - Creating a Linux user
CREATE USER apim WITH PASSWORD 'apim';
Note: Give the password as 'apim'
Step 2 - Login as super user
sudo su - postgres
If successfully logged in, you should get a prompt as below
postgres@ubuntu2:~$
Step 3 - Then connect to the database serve
psql -d template1 -U postgres
Step 4 - Create a user
CREATE USER apim WITH PASSWORD 'apim';
Step 5 - Create a database
CREATE DATABASE apim;
Step 6 - Grant permission for the user to the database
GRANT ALL PRIVILEGES ON DATABASE apim to apim;
Now that you have created the user, database and granted permission, you can provide these credentials and try to connect your WSO2 server with this newly created database.
Configuring WSO2 Products with PostgreSQL
Step 1 - Configuring master-datasources.xml
Open the master-datasources.xml of the product you have selected and provide the configuration as below
<datasource>
<name>WSO2AM_DB</name>
<description>The datasource used for API Manager database</description>
<jndiConfig>
<name>jdbc/WSO2AM_DB</name>
</jndiConfig>
<definition type="RDBMS">
<configuration>
<url>jdbc:postgresql://localhost:5432/apim</url>
<username>apim</username>
<password>apim</password>
<defaultAutoCommit>false</defaultAutoCommit>
<driverClassName>org.postgresql.Driver</driverClassName>
<maxActive>50</maxActive>
<maxWait>60000</maxWait>
<testOnBorrow>true</testOnBorrow>
<validationQuery>SELECT 1</validationQuery>
<validationInterval>30000</validationInterval>
</configuration>
</definition>
</datasource>
Step 2 - Downloading the correct DB driver
You have to download the correct database driver from the PostgreSQL site. Once downloaded, drop it to $CARBON_HOME/repository/component/lib.
Step 3 - Starting up the server
Now start up the server using the -Dsetup command and it will create the relevant tables in the database.
Friday, August 14, 2015
Enabing E-mail User Login for WSO2 Products
This post explains different ways e-mail login can be enabled and how users/tenants can login to WSO2 products.
Pre-requisites
Users, tenants and their e-mail addresses that will be used for this scenario are as follows.
Super Admin User Name - admin
A user of Super Admin - adminUser
Email of Super Admin user - admin@yahoo.com
Email of a user of Super Admin - adminUser@gmail.com
Tenant Domain - tenantdomain.com
Tenant Admin - admin@tenantdomain.com
Tenant User - tenantDomainUser@tenantdomain.com
Tenant Admin Email - admin@hotmail.com
Tenant User Email - tenantDomainUser@aol.com
How to create tenants
When creating tenants, you have to give the tenant Admin Username as something like admin@gmail.com & not as admin
Scenario 1
Configuration that needs to be done
carbon.xml
<EnableEmailUserName>true</EnableEmailUserName>
user-mgt.xml
For JDBC User Stores
<Property name="UsernameWithEmailJavaScriptRegEx">[a-zA-Z0-9@._-|//]{3,30}$</Property>
For LDAP based User Stores
<Property name="UserNameSearchFilter">(&(objectClass=person)(|(mail=?)(uid=?)))</Property>
& Comment out the following
<!--Property name="UserDNPattern">uid={0},ou=Users,dc=wso2,dc=org</Property-->
So when you do the above configuration, you can login from the following types of users
- admin
- admin@yahoo.com
- admin@yahoo.com@carbon.super
- adminUser
- adminUser@gmail.com
- adminUser@gmail.com@carbon.super
- admin@hotmail.com@tenantdomain.com
- tenantDomainUser@aol.com@tenantdomain.com
You cannot login as
- admin@tenantdomain.com
- tenantDomainUser@tenantdomain.com
Senario 2 - Without configuring EnableEmailUserName property in carbon.xml
Configuration that needs to be done
carbon.xml
<EnableEmailUserName>false</EnableEmailUserName>
user-mgt.xml
Same as in Scenario 1 above
You should be able to login from the below users/email addresses
- admin
- admin@yahoo.com@carbon.super
- adminUser
- adminUser@gmail.com@carbon.super
- admin@hotmail.com@tenantdomain.com
- tenantDomainUser@aol.com@tenantdomain.com
- tenantDomainUser@tenantdomain.com
Cannot login from
- admin@yahoo.com
- adminUser@gmail.com
- admin@tenantdomain.com
To create users with email addresses, you need to change the following properties of the LDAP user store configuration.
<Property name="UserNameAttribute">mail</Property>
<Property name="UsernameJavaRegEx">[a-zA-Z0-9@._-|//]{3,30}$</Property>
<Property name="UserNameSearchFilter">(&(objectClass=person)(mail=?))</Property>
After configuring your server with the above configs, you should be able to add users with email addresses as well as with uids.
For more information, go through the detailed blog written by Asela Pathberiya.
Pre-requisites
Users, tenants and their e-mail addresses that will be used for this scenario are as follows.
Super Admin User Name - admin
A user of Super Admin - adminUser
Email of Super Admin user - admin@yahoo.com
Email of a user of Super Admin - adminUser@gmail.com
Tenant Domain - tenantdomain.com
Tenant Admin - admin@tenantdomain.com
Tenant User - tenantDomainUser@tenantdomain.com
Tenant Admin Email - admin@hotmail.com
Tenant User Email - tenantDomainUser@aol.com
How to create tenants
When creating tenants, you have to give the tenant Admin Username as something like admin@gmail.com & not as admin
Scenario 1
Configuration that needs to be done
carbon.xml
<EnableEmailUserName>true</EnableEmailUserName>
user-mgt.xml
For JDBC User Stores
<Property name="UsernameWithEmailJavaScriptRegEx">[a-zA-Z0-9@._-|//]{3,30}$</Property>
For LDAP based User Stores
<Property name="UserNameSearchFilter">(&(objectClass=person)(|(mail=?)(uid=?)))</Property>
& Comment out the following
<!--Property name="UserDNPattern">uid={0},ou=Users,dc=wso2,dc=org</Property-->
So when you do the above configuration, you can login from the following types of users
- admin
- admin@yahoo.com
- admin@yahoo.com@carbon.super
- adminUser
- adminUser@gmail.com
- adminUser@gmail.com@carbon.super
- admin@hotmail.com@tenantdomain.com
- tenantDomainUser@aol.com@tenantdomain.com
You cannot login as
- admin@tenantdomain.com
- tenantDomainUser@tenantdomain.com
Senario 2 - Without configuring EnableEmailUserName property in carbon.xml
Configuration that needs to be done
carbon.xml
<EnableEmailUserName>false</EnableEmailUserName>
user-mgt.xml
Same as in Scenario 1 above
You should be able to login from the below users/email addresses
- admin
- admin@yahoo.com@carbon.super
- adminUser
- adminUser@gmail.com@carbon.super
- admin@hotmail.com@tenantdomain.com
- tenantDomainUser@aol.com@tenantdomain.com
- tenantDomainUser@tenantdomain.com
Cannot login from
- admin@yahoo.com
- adminUser@gmail.com
- admin@tenantdomain.com
To create users with email addresses, you need to change the following properties of the LDAP user store configuration.
<Property name="UserNameAttribute">mail</Property>
<Property name="UsernameJavaRegEx">[a-zA-Z0-9@._-|//]{3,30}$</Property>
<Property name="UserNameSearchFilter">(&(objectClass=person)(mail=?))</Property>
After configuring your server with the above configs, you should be able to add users with email addresses as well as with uids.
For more information, go through the detailed blog written by Asela Pathberiya.
Subscribe to:
Posts (Atom)