Generally chunking is enabled by default. If you need to disable chunking/keep-alive all you have to do is set the property "FORCE_HTTP_1.0" to "TRUE" in the scope axis2 using Property Mediator
Friday, October 3, 2008
How to disable chunking/keep-alive when using Synapse
How do you disable chunking/keep-alive? Many users have asked this question through the Synapse/WSO2 ESB mailing lists several times. This is possible through the Property mediator.
Generally chunking is enabled by default. If you need to disable chunking/keep-alive all you have to do is set the property "FORCE_HTTP_1.0" to "TRUE" in the scope axis2 using Property Mediator
Generally chunking is enabled by default. If you need to disable chunking/keep-alive all you have to do is set the property "FORCE_HTTP_1.0" to "TRUE" in the scope axis2 using Property Mediator

Thursday, October 2, 2008
How to enable JMX monitoring support on Synapse
How do you enable JMX monitoring support on Synapse? This is a question that may arise in someone who would try out Synapse. In order to do this you will have to add the following line to the synapse.sh file
-Dcom.sun.management.jmxremote
Once this line is added you just need to start the Synapse server. When the Synapse server is started, open a new terminal window and type the command 'jconsole' and then you will be given the Monitoring & Management Console along with the available servers to connect
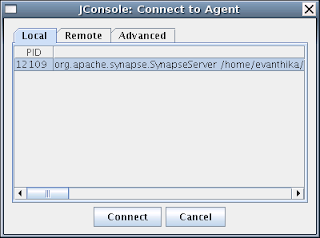
-Dcom.sun.management.jmxremote
Once this line is added you just need to start the Synapse server. When the Synapse server is started, open a new terminal window and type the command 'jconsole' and then you will be given the Monitoring & Management Console along with the available servers to connect

Friday, September 26, 2008
How to get a thread dump of WSO2 Servers
I will explain in terms of the product WSO2 ESB.
When WSO2 ESB server is running, find the process ID by using the following command
ps -ef | grep wso2esb
Once you find the process ID, use the following command and then you will get a thread dump on the WSO2 ESB console
kill -3 [ProcessID_of_WSO2ESB]
Also, you can get the thread dump to a text file by giving a command as follows
jstack $PID > thread_dump.txt
When WSO2 ESB server is running, find the process ID by using the following command
ps -ef | grep wso2esb
Once you find the process ID, use the following command and then you will get a thread dump on the WSO2 ESB console
kill -3 [ProcessID_of_WSO2ESB]
Also, you can get the thread dump to a text file by giving a command as follows
jstack $PID > thread_dump.txt
Wednesday, September 24, 2008
Setting up WSO2 ESB in a clustered environment
I will briefly describe how one can easily set up WSO2 ESB in a clustered environment.
Prerequisites
Download the latest version of WSO2 ESB and extract to a folder of your choice. (I will refer to the two WSO2 ESB instances as cluster1 and cluster2)
NOTE: I will be having both the WSO2 ESB instances on my local machine.
Step 1
Out of the two WSO2 ESB instances, select one and edit the default ports. (cluster2)
a) axis2.xml ($ESB_HOME/webapp/WEB-INF/classes/conf)
- To enable clustering uncomment the following of both ESB instances
<parameter name="AvoidInitiation">false</parameter>
<parameter name="domain">wso2esb.domain</parameter>
...
...
</cluster>
- Change the HTTP and HTTPS ports specified in the axis2.xml of cluster2 (E.g.:- HTTP - 8281 , HTTPS - 8244)
b) tomcat.properties of cluster2 should also be changed as follows ($ESB_HOME/tomcat/config)
Change the Admin console port given in the tomcat.properties file (E.g.:- 9443)
Step 2
Edit the ./wso2esb.sh file of both the instances (cluster1 and cluster2) and add the following
-Daxis2.local.ip.address=<Your_IP>
Now you are all ready to start the two WSO2 ESB instances in the clustered environment
Prerequisites
Download the latest version of WSO2 ESB and extract to a folder of your choice. (I will refer to the two WSO2 ESB instances as cluster1 and cluster2)
NOTE: I will be having both the WSO2 ESB instances on my local machine.
Step 1
Out of the two WSO2 ESB instances, select one and edit the default ports. (cluster2)
a) axis2.xml ($ESB_HOME/webapp/WEB-INF/classes/conf)
- To enable clustering uncomment the following of both ESB instances
<parameter name="AvoidInitiation">false</parameter>
<parameter name="domain">wso2esb.domain</parameter>
...
...
</cluster>
- Change the HTTP and HTTPS ports specified in the axis2.xml of cluster2 (E.g.:- HTTP - 8281 , HTTPS - 8244)
b) tomcat.properties of cluster2 should also be changed as follows ($ESB_HOME/tomcat/config)
Change the Admin console port given in the tomcat.properties file (E.g.:- 9443)
Step 2
Edit the ./wso2esb.sh file of both the instances (cluster1 and cluster2) and add the following
-Daxis2.local.ip.address=<Your_IP>
Now you are all ready to start the two WSO2 ESB instances in the clustered environment
Thursday, September 18, 2008
Reliable message exchange with WSO2 ESB - Invoking WS-RM Service using nonWS-RM one-way client
Invoking a WS-RM enabled service using a one-way client where WS-RM is not enabled
Reliable messaging allows messages to be delivered reliably between applications in the presence of system, or network failures. I will breifly describe how reliable messaging is made possible with WSO2 ESB along with some samples. Step by step information will be provided on how to configure WSO2 ESB to handle the exchanging of messages between WS-Reliable Messaging (WS-RM) enabled services and clients.
To start off with, you will need to download and install WSO2 ESB on your machine. (Refer https://wso2.org/project/esb/java/1.7.1/docs/installationguide.html on how to download and install WSO2 ESB). From this point onwards the location where WSO2 ESB is installed will be refered to as ESB_HOME.
Step 1 - Creating and deploying a WS-RM enabled service.
The implementation class should be created as follows.
package org.wso2.esb.services;
public class RMService {
public void Ping(String x){
System.out.println("Received Ping request");
}
}
Then create a services.xml file as follows
<service name="RMService">
<description>This service is created to add two numbers.</description>
<parameter name="ServiceClass" locked="false">org.wso2.esb.services.RMService</parameter>
<messageReceivers>
<messageReceiver mep="http://www.w3.org/2006/01/wsdl/in-only" class="org.apache.axis2.rpc.receivers.RPCInOnlyMessageReceiver"/>
<messageReceiver mep="http://www.w3.org/2006/01/wsdl/in-out" class="org.apache.axis2.rpc.receivers.RPCMessageReceiver"/>
</messageReceivers>
<module ref="Mercury"/>
</service>
Place the above services.xml file in a directory named META-INF. Compile the RMService class and get the compiled class, bundle it with the META-INF file and create an .aar file. For testing purposes we will be using the SimpleAxisServer which comes with the WSO2 ESB package so deploy the services. Therefore drop the created archive file in ESB_HOME/samples/axis2Server/repository/services. (To check if the service has been deployed successfully access http://localhost:9000/soap)
Step 2 - Creating the WSO2 ESB Configuration
Start the WSO2 ESB server located at ESB_HOME/bin and access the WSO2 ESB Admin console through https://localhost:9444/esb/
Inorder for the non-WS-RM client to communicate with the WS-RM enabled service the folling configuration should be used. Log in to the WSO2 ESB admin console (username - admin, password - admin) and create the following configuration.
<definitions xmlns="http://ws.apache.org/ns/synapse">
<proxy name="RMProxy" transports="http" startOnLoad="true" statistics="enable">
<target>
<inSequence>
<RMSequence single="true" version="1.0"/>
<send>
<endpoint>
<address uri="http://localhost:9000/soap/RMService">
<enableAddressing/>
<enableRM/>
</address>
</endpoint>
</send>
</inSequence>
<outSequence>
<send/>
</outSequence>
</target>
<enableRM/>
</proxy>
</definitions>
Step 3 - Generating Stubs
Inorder for the client to successfully execute we need to generate stubs. This can easily be done through WSO2 WSAS. (Refer http://charithaka.blogspot.com/2008/02/securing-axis2wsas-web-services-with.html Step 3). For ease of use I will be providing a generated jar file which works with the below client code. You can download it from here
Make sure to add jars in ESB_HOME/lib and the above downloaded client stub jar to your class path in order to compile the client.
Step 4 - Create a non-WS-RM Client
The next step would be create a client to invoke the WS-RM enabled service as follows. The below client supports only SOAP11 messages. For you to try out SOAP12 messages you can use the client OneWayAnnonSOAP12Client.
public class OneWayAnnonSOAP11Client {
public static void main(String[] args)throws AxisFault {
ConfigurationContext cc = ConfigurationContextFactory.createConfigurationContextFromFileSystem("/home/rmScenario/client_repo","/home/rmScenario/client-repo/axis2.xml");
OMElement payload = createPayLoad();
ServiceClient serviceclient = new ServiceClient(cc, null);
Options opts = new Options();
opts.setTo(new EndpointReference("http://localhost:8280/soap/RMProxy"));
opts.setAction("urn:Ping");
serviceclient.setOptions(opts);
try {
serviceclient.fireAndForget(payload);
} catch (RemoteException e) {
e.printStackTrace();
}
try {
Thread.sleep(1000);
} catch (InterruptedException e) {
e.printStackTrace();
}
}
public static OMElement createPayLoad(){
OMFactory fac = OMAbstractFactory.getOMFactory();
OMNamespace omNs = fac.createOMNamespace("http://service.esb.wso2.org", "ns");
OMElement method = fac.createOMElement("Ping", omNs);
OMElement value = fac.createOMElement("ping", omNs);
value.addChild(fac.createOMText(method, "pong"));
method.addChild(value);
return method;
}
}
You can access the entire client code from here.
Before you execute the client, make sure you have copied the Mercury.mar (make sure that the mar file is inside a folder named 'module') and axis2.xml to the specified locations above.
Step 5 - Starting the Simple Axis2 Server
Go to the ESB_HOME/samples/axis2Server and start the simple axis2server
E.g.:- sh ./axis2Server.sh
Step 6 - Executing the client
Now you are all set to execute the client. To see whether the messages are being sent properly you can send them through TCPMon.
Reliable messaging allows messages to be delivered reliably between applications in the presence of system, or network failures. I will breifly describe how reliable messaging is made possible with WSO2 ESB along with some samples. Step by step information will be provided on how to configure WSO2 ESB to handle the exchanging of messages between WS-Reliable Messaging (WS-RM) enabled services and clients.
To start off with, you will need to download and install WSO2 ESB on your machine. (Refer https://wso2.org/project/esb/java/1.7.1/docs/installationguide.html on how to download and install WSO2 ESB). From this point onwards the location where WSO2 ESB is installed will be refered to as ESB_HOME.
Step 1 - Creating and deploying a WS-RM enabled service.
The implementation class should be created as follows.
package org.wso2.esb.services;
public class RMService {
public void Ping(String x){
System.out.println("Received Ping request");
}
}
Then create a services.xml file as follows
<service name="RMService">
<description>This service is created to add two numbers.</description>
<parameter name="ServiceClass" locked="false">org.wso2.esb.services.RMService</parameter>
<messageReceivers>
<messageReceiver mep="http://www.w3.org/2006/01/wsdl/in-only" class="org.apache.axis2.rpc.receivers.RPCInOnlyMessageReceiver"/>
<messageReceiver mep="http://www.w3.org/2006/01/wsdl/in-out" class="org.apache.axis2.rpc.receivers.RPCMessageReceiver"/>
</messageReceivers>
<module ref="Mercury"/>
</service>
Place the above services.xml file in a directory named META-INF. Compile the RMService class and get the compiled class, bundle it with the META-INF file and create an .aar file. For testing purposes we will be using the SimpleAxisServer which comes with the WSO2 ESB package so deploy the services. Therefore drop the created archive file in ESB_HOME/samples/axis2Server/repository/services. (To check if the service has been deployed successfully access http://localhost:9000/soap)
Step 2 - Creating the WSO2 ESB Configuration
Start the WSO2 ESB server located at ESB_HOME/bin and access the WSO2 ESB Admin console through https://localhost:9444/esb/
Inorder for the non-WS-RM client to communicate with the WS-RM enabled service the folling configuration should be used. Log in to the WSO2 ESB admin console (username - admin, password - admin) and create the following configuration.
<definitions xmlns="http://ws.apache.org/ns/synapse">
<proxy name="RMProxy" transports="http" startOnLoad="true" statistics="enable">
<target>
<inSequence>
<RMSequence single="true" version="1.0"/>
<send>
<endpoint>
<address uri="http://localhost:9000/soap/RMService">
<enableAddressing/>
<enableRM/>
</address>
</endpoint>
</send>
</inSequence>
<outSequence>
<send/>
</outSequence>
</target>
<enableRM/>
</proxy>
</definitions>
Step 3 - Generating Stubs
Inorder for the client to successfully execute we need to generate stubs. This can easily be done through WSO2 WSAS. (Refer http://charithaka.blogspot.com/2008/02/securing-axis2wsas-web-services-with.html Step 3). For ease of use I will be providing a generated jar file which works with the below client code. You can download it from here
Make sure to add jars in ESB_HOME/lib and the above downloaded client stub jar to your class path in order to compile the client.
Step 4 - Create a non-WS-RM Client
The next step would be create a client to invoke the WS-RM enabled service as follows. The below client supports only SOAP11 messages. For you to try out SOAP12 messages you can use the client OneWayAnnonSOAP12Client.
public class OneWayAnnonSOAP11Client {
public static void main(String[] args)throws AxisFault {
ConfigurationContext cc = ConfigurationContextFactory.createConfigurationContextFromFileSystem("/home/rmScenario/client_repo","/home/rmScenario/client-repo/axis2.xml");
OMElement payload = createPayLoad();
ServiceClient serviceclient = new ServiceClient(cc, null);
Options opts = new Options();
opts.setTo(new EndpointReference("http://localhost:8280/soap/RMProxy"));
opts.setAction("urn:Ping");
serviceclient.setOptions(opts);
try {
serviceclient.fireAndForget(payload);
} catch (RemoteException e) {
e.printStackTrace();
}
try {
Thread.sleep(1000);
} catch (InterruptedException e) {
e.printStackTrace();
}
}
public static OMElement createPayLoad(){
OMFactory fac = OMAbstractFactory.getOMFactory();
OMNamespace omNs = fac.createOMNamespace("http://service.esb.wso2.org", "ns");
OMElement method = fac.createOMElement("Ping", omNs);
OMElement value = fac.createOMElement("ping", omNs);
value.addChild(fac.createOMText(method, "pong"));
method.addChild(value);
return method;
}
}
You can access the entire client code from here.
Before you execute the client, make sure you have copied the Mercury.mar (make sure that the mar file is inside a folder named 'module') and axis2.xml to the specified locations above.
Step 5 - Starting the Simple Axis2 Server
Go to the ESB_HOME/samples/axis2Server and start the simple axis2server
E.g.:- sh ./axis2Server.sh
Step 6 - Executing the client
Now you are all set to execute the client. To see whether the messages are being sent properly you can send them through TCPMon.
Wednesday, July 9, 2008
How to deploy WSO2 ESB on Apache Tomcat
WSO2 ESB can be deployed on differnt application servers such as IBM WebSphere, BEA WebLogic Server, JBoss and Apache Tomcat. I will be describing how one can easily deploy WSO2 ESB on Apache Tomcat. A similar article has been written on how to deploy WSO2 ESB on WebLogic by Asankha Perera - Running the WSO2 Enterprise Service Bus (ESB) on the WebLogic Application Server.
Step 1 - Downloading and installing Apache Tomcat
You can download the latest version of Apache Tomcat from here (I will be using Apache Tomcat 5.5.26 to demonstrate this scenario).
Extract the downloaded distribution to a specific location and define the environment variables properly.
E.g.: -
export CATALINA_HOME=/opt/installations/tomcat/apache-
tomcat-5.5.26
export PATH=$PATH:$CATALINA_HOME/bin
Next you will need to enable HTTPS on Apache Tomcat since WSO2 ESB runs over HTTPS. To do this, access the server.xml file located at $CATALINA_HOME/conf and uncomment the following.
<Connector port="8443" maxHttpHeaderSize="8192"
maxThreads="150" minSpareThreads="25" maxSpareThreads="75"
enableLookups="false" disableUploadTimeout="true"
acceptCount="100" scheme="https" secure="true"
clientAuth="false" sslProtocol="TLS"/>
Then you will need to provide the keystore file location along with it's password as below.
<Connector port="8443" maxHttpHeader
maxThreads="150" minSpareThreads="25" maxSpareThreads="75"
enableLookups="false" disableUploadTimeout="true"
acceptCount="100" scheme="https" secure="true"
clientAuth="false" sslProtocol="TLS"
keystore="/opt/wso2esb-1.7/webapp/WEB-INF/classes
/conf/identity.jks"
keypass="password">
Step 2 - Starting the Apache Tomcat Server
Now you can start the Apache Tomcat server by giving the following command.
sh ./catalina.sh run
Step 3 - Downloading and installing WSO2 ESB
Download the latest WSO2 ESB distribution from here and extract to a specific location. (E.g.:- /opt/wso2esb-1.7)
Step 4 - Changing necessary files of the WSO2 ESB distribution
In order for the deployement to be successful you will need to change some files of the WSO2 ESB distribution.
a) Editing the web.xml
<servlet>
<servlet-name>ESBStartUpServlet</servlet-name> <servlet-class>org.wso2.esb.transport.tomcat.
StartUpServlet</servlet-class>
<init-param>
<param-name>esb.home</param-name>
<param-value>/opt/wso2esb-1.7</param-value>
</init-param>
b) Editing the axis2.xml
Next you will need to change the paths of the keystore and truststore files specified in the axis2.xml as below specifying the absolute paths.
<parameter name="keystore" locked="false">
<KeyStore>
<Location>/opt/wso2esb-1.7/webapp/WEB-INF/
classes/conf/identity.jks</Location>
<Type>JKS</Type>
<Password>password</Password>
<KeyPassword>password</KeyPassword>
</KeyStore>
</parameter>
<parameter name="truststore" locked="false">
<TrustStore>
<Location>/opt/wso2esb-1.7/webapp/WEB-INF
/classes/conf/trust.jks</Location>
<Type>JKS</Type>
<Password>password</Password>
</TrustStore>
</parameter>
Now all the required files are edited and you can create a .war file with all the required files of WSO2 ESB.
Step 5 - Creating the WSO2 ESB .war file
Navigate to the folder /opt/wso2esb-1.7/webapp and type the command.
jar -cvf esb.war *
It would create a war file inside the /opt/wso2esb-1.7/webapp folder.
Step 6 - Deploying the esb.war on Apache Tomcat
Now navigate to $CATALINA_HOME/webapps folder and drop the esb.war file which you created. If everything goes well the WSO2 ESB server should start successfully and you should see something like the following on the console which you started the Apache Tomcat server.
2008-07-09 15:09:02,030 ......INFO ServerManager Ready for processing
2008-07-09 15:09:03,654 ......INFO ServiceBusManager [ESB] Start request completed
Step 7 - Login to the WSO2 ESB Administration Console
Now you should be able to login to the WSO2 ESB Administration Console as, https://localhost:8443/esb
Step 1 - Downloading and installing Apache Tomcat
You can download the latest version of Apache Tomcat from here (I will be using Apache Tomcat 5.5.26 to demonstrate this scenario).
Extract the downloaded distribution to a specific location and define the environment variables properly.
E.g.: -
export CATALINA_HOME=/opt/installations/tomcat/apache-
tomcat-5.5.26
export PATH=$PATH:$CATALINA_HOME/bin
Next you will need to enable HTTPS on Apache Tomcat since WSO2 ESB runs over HTTPS. To do this, access the server.xml file located at $CATALINA_HOME/conf and uncomment the following.
<Connector port="8443" maxHttpHeaderSize="8192"
maxThreads="150" minSpareThreads="25" maxSpareThreads="75"
enableLookups="false" disableUploadTimeout="true"
acceptCount="100" scheme="https" secure="true"
clientAuth="false" sslProtocol="TLS"/>
Then you will need to provide the keystore file location along with it's password as below.
<Connector port="8443" maxHttpHeader
maxThreads="150" minSpareThreads="25" maxSpareThreads="75"
enableLookups="false" disableUploadTimeout="true"
acceptCount="100" scheme="https" secure="true"
clientAuth="false" sslProtocol="TLS"
keystore="/opt/wso2esb-1.7/webapp/WEB-INF/classes
/conf/identity.jks"
keypass="password">
Step 2 - Starting the Apache Tomcat Server
Now you can start the Apache Tomcat server by giving the following command.
sh ./catalina.sh run
Step 3 - Downloading and installing WSO2 ESB
Download the latest WSO2 ESB distribution from here and extract to a specific location. (E.g.:- /opt/wso2esb-1.7)
Step 4 - Changing necessary files of the WSO2 ESB distribution
In order for the deployement to be successful you will need to change some files of the WSO2 ESB distribution.
a) Editing the web.xml
To begin with you will need to change the init parameter of "ESBStartUpServlet" of the web.xml which is located at /opt/wso2esb-1.7/webapp/WEB-INF as below.
<servlet>
<servlet-name>ESBStartUpServlet</servlet-name> <servlet-class>org.wso2.esb.transport.tomcat.
StartUpServlet</servlet-class>
<init-param>
<param-name>esb.home</param-name>
<param-value>/opt/wso2esb-1.7</param-value>
</init-param>
b) Editing the axis2.xml
Next you will need to change the paths of the keystore and truststore files specified in the axis2.xml as below specifying the absolute paths.
<parameter name="keystore" locked="false">
<KeyStore>
<Location>/opt/wso2esb-1.7/webapp/WEB-INF/
classes/conf/identity.jks</Location>
<Type>JKS</Type>
<Password>password</Password>
<KeyPassword>password</KeyPassword>
</KeyStore>
</parameter>
<parameter name="truststore" locked="false">
<TrustStore>
<Location>/opt/wso2esb-1.7/webapp/WEB-INF
/classes/conf/trust.jks</Location>
<Type>JKS</Type>
<Password>password</Password>
</TrustStore>
</parameter>
Now all the required files are edited and you can create a .war file with all the required files of WSO2 ESB.
Step 5 - Creating the WSO2 ESB .war file
Navigate to the folder /opt/wso2esb-1.7/webapp and type the command.
jar -cvf esb.war *
It would create a war file inside the /opt/wso2esb-1.7/webapp folder.
Step 6 - Deploying the esb.war on Apache Tomcat
Now navigate to $CATALINA_HOME/webapps folder and drop the esb.war file which you created. If everything goes well the WSO2 ESB server should start successfully and you should see something like the following on the console which you started the Apache Tomcat server.
2008-07-09 15:09:02,030 ......INFO ServerManager Ready for processing
2008-07-09 15:09:03,654 ......INFO ServiceBusManager [ESB] Start request completed
Step 7 - Login to the WSO2 ESB Administration Console
Now you should be able to login to the WSO2 ESB Administration Console as, https://localhost:8443/esb
Monday, June 30, 2008
Database interactions in mediation using DBLookup and DBReport mediators with MySQL
MySQL is known to be the world's most popular open source database due to its fast performance. It is a known fact that a many individuals as well as a lot of world's largest organizations such as Yahoo, Google, Nokia and YouTube use MySQL as their database to save time and money. WS02 ESB has a wide variety of mediators that enables us to connect, manage and transform service interactions between Web services. The DBLookup and DBReport mediators allows you to read data from a database and also to write to a database. Generally we use Apache Derby as the database in our samples but we can use MySQL as well. Let us see how we can use these mediators to look up and report to a MySQL database. Step 1 - Setting up the MySQL database
You will need to install MySQL server on your machine. Once you have installed MySQL, log into the database using the command
mysql -u <username> -p
E.g.:- mysql -u root -p
Create a database using the following command.
create database esb;
Select the newly created database as follows
CREATE table company(name varchar(10), id varchar(10), price double);
Now create a table using the following command on the newly created database
INSERT into company values ('IBM','c1',0.0);
INSERT into company values ('SUN','c2',0.0);
INSERT into company values ('MSFT','c3',0.0);
Step 2 - Installing WSO2 ESB
a) Downloading the binary distribution
You will need to install WSO2 ESB on your machine. You can download the latest ESB binary distribution from here.
b) Deploying the service
d) Starting the WSO2 ESB server
Step 3 - Create configuration
The following configuration sends a request to a service and receives a response and then the database is updated from those retrieved response values. Create the following configuration using the WS02 ESB admin console.
NOTE: When using MySQL as the database make sure that you set the following property in the configurationYou will need to install MySQL server on your machine. Once you have installed MySQL, log into the database using the command
mysql -u <username> -p
E.g.:- mysql -u root -p
Create a database using the following command.
create database esb;
Select the newly created database as follows
CREATE table company(name varchar(10), id varchar(10), price double);
Now create a table using the following command on the newly created database
INSERT into company values ('IBM','c1',0.0);
INSERT into company values ('SUN','c2',0.0);
INSERT into company values ('MSFT','c3',0.0);
Step 2 - Installing WSO2 ESB
a) Downloading the binary distribution
You will need to install WSO2 ESB on your machine. You can download the latest ESB binary distribution from here.
b) Deploying the service
Extract the distribution and navigate to the ESB_HOME/samples/axis2Server folder and start the Axis2 Server. To deploy the SimpleStockQuoteService go to ESB_HOME/samples/axis2Server/src/SimpleStockQuoteService and type 'ant' and it will build the particular service. You can verify whether the service has been deployed successfully by accessing the URL http://localhost:9000/soap/
c) Starting the Simple Axis2 Server
To start the simple axis server navigate to ESB_HOME/samples/axis2Server and run ./axis2Server.sh. Then it would start the axis2 server on port 9000
c) Starting the Simple Axis2 Server
To start the simple axis server navigate to ESB_HOME/samples/axis2Server and run ./axis2Server.sh. Then it would start the axis2 server on port 9000
d) Starting the WSO2 ESB server
To start the WSO2 ESB server go to ESB_HOME/bin and run ./wso2-esb.sh. Once the WSO2 ESB server is started you will be able to access the WSO2 ESB admin console using https://localhost:9444/esb
Step 3 - Create configuration
The following configuration sends a request to a service and receives a response and then the database is updated from those retrieved response values. Create the following configuration using the WS02 ESB admin console.
<syn:definitions xmlns:syn="http://ws.apache.org/ns/synapse">
  <syn:sequence name="sample_sequence2">
        <syn:in>
            <syn:send>
                <syn:endpoint>
                    <syn:address uri="http://localhost:9000/soap/SimpleStockQuoteService"/>
                </syn:endpoint>
            </syn:send>
        </syn:in>
        <syn:out>
            <syn:log level="custom">
                <syn:property name="text" value="** Reporting to the Database **"/>
            </syn:log>
            <syn:dbreport>
                <syn:connection>
                    <syn:pool>
                        <syn:driver>com.mysql.jdbc.Driver</syn:driver>
                        <syn:property name="autocommit" value="false"/>
                        <syn:password>admin</syn:password>
                        <syn:user>root</syn:user>
                        <syn:url>jdbc:mysql://127.0.0.1:3306/esb</syn:url>
                    </syn:pool>
                </syn:connection>
                <syn:statement>
                    <syn:sql><update company set price=? where name =?></syn:sql>
                    <syn:parameter xmlns:m0="http://services.samples/xsd" xmlns:soapenv="http://schemas.xmlsoap.org/soap/envelope/" expression="//m0:return/m0:last/child::text()" type="DOUBLE"/>
                    <syn:parameter xmlns:m0="http://services.samples/xsd" xmlns:soapenv="http://schemas.xmlsoap.org/soap/envelope/" expression="//m0:return/m0:symbol/child::text()" type="VARCHAR"/>
                </syn:statement>
            </syn:dbreport>
            <syn:log level="custom">
                <syn:property name="text" value="** Looking up from the Database **"/>
            </syn:log>
            <syn:dblookup>
                <syn:connection>
                    <syn:pool>
                        <syn:driver>com.mysql.jdbc.Driver</syn:driver>
                        <syn:password>admin</syn:password>
                        <syn:user>root</syn:user>
                        <syn:url>jdbc:mysql://127.0.0.1:3306/esb</syn:url>
                    </syn:pool>
                </syn:connection>
                <syn:statement>
                    <syn:sql><select * from company where name =?></syn:sql>
                    <syn:parameter xmlns:m0="http://services.samples/xsd" xmlns:soapenv="http://schemas.xmlsoap.org/soap/envelope/" expression="//m0:return/m0:symbol/child::text()" type="VARCHAR"/>
                    <syn:result name="stock_price" column="price"/>
                </syn:statement>
            </syn:dblookup>
            <syn:log level="custom">
                <syn:property xmlns:ns1="http://org.apache.synapse/xsd" xmlns:soapenv="http://schemas.xmlsoap.org/soap/envelope/" name="text" expression="fn:concat('Stock price - ',get-property('stock_price'))"/>
            </syn:log>
            <syn:send/>
        </syn:out>
    </syn:sequence>
</syn:definitions>
<syn:property name="autocommit" value="false"/>Step 4 - Invoking the client
Once the configuration is created you should be able to invoke the stockquote client using the following command.
ant stockquote -Daddurl=http://localhost:9000/soap/SimpleStockQuoteService -Dtrpurl=http://localhost:8280/ -Dsymbol=IBM
If the client executes successfully you should see the following on the WSO2 ESB console
DEBUG LogMediator Start : Log mediator
INFO LogMediator text = ** Reporting to the Database **
DEBUG LogMediator End : Log mediator
....
DEBUG DBReportMediator Successfully prepared statement : update company set price=? where name =? against DataSource : jdbc:mysql://127.0.0.1:3306/esb
DEBUG DBReportMediator Inserted 1 row/s using statement : update company set price=? where name =?
....
DEBUG LogMediator Start : Log mediator
INFO LogMediator text = ** Looking up from the Database **
DEBUG LogMediator End : Log mediator
....
DEBUG DBLookupMediator Successfully prepared statement : select * from company where name =? against DataSource : jdbc:mysql://127.0.0.1:3306/esb
DEBUG DBLookupMediator End : DBLookup mediator
DEBUG LogMediator Start : Log mediator
INFO LogMediator text = Stock price - 147.286209770313
DEBUG LogMediator End : Log mediator
Finally you can check if the company table has been updated with the new stock value by a simple query.
Subscribe to:
Posts (Atom)