Assume you have a scenario where want to do something based on the fact whether a property value is null or not.
Using the Filter mediator, this is possible. See below for the configuration.
<filter regex="^\d+$" xpath="get-property('memberId')">
<then>//Do something</then>
<else>//Do something else</else>
</filter>
Sunday, April 7, 2019

Wednesday, January 10, 2018
Why don't I see "Request Body" in the "Raw tab" of SOAP UI
When sending requests in SOAP UI, I was not able to see the Request Body in the Raw tab.
The reason for was this was a setting in SOAP UI.
To enable this, all you have to do is, go to Preferences and then go to Editor Settings and check Validate Requests and Validate Responses check boxes.

The reason for was this was a setting in SOAP UI.
To enable this, all you have to do is, go to Preferences and then go to Editor Settings and check Validate Requests and Validate Responses check boxes.

Monday, November 6, 2017
How to resolve "Could not generate DH keypair" issue faced with WSO2 products
When working with WSO2 products, sometimes, you might see the below exception when trying out security scenarios with JDK 1.7.
TID: [0] [AS] [2017-11-07 05:02:26,655] ERROR {org.apache.tomcat.util.net.NioEndpoint$SocketProcessor} - {org.apache.tomcat.util.net.NioEndpoint$SocketProcessor}
java.lang.RuntimeException: Could not generate DH keypair
at sun.security.ssl.Handshaker.checkThrown(Handshaker.java:1345)
at sun.security.ssl.SSLEngineImpl.checkTaskThrown(SSLEngineImpl.java:519)
at sun.security.ssl.SSLEngineImpl.readNetRecord(SSLEngineImpl.java:796)
at sun.security.ssl.SSLEngineImpl.unwrap(SSLEngineImpl.java:764)
at javax.net.ssl.SSLEngine.unwrap(SSLEngine.java:624)
at org.apache.tomcat.util.net.SecureNioChannel.handshakeUnwrap(SecureNioChannel.java:335)
at org.apache.tomcat.util.net.SecureNioChannel.handshake(SecureNioChannel.java:193)
at org.apache.tomcat.util.net.NioEndpoint$SocketProcessor.run(NioEndpoint.java:1642)
at java.util.concurrent.ThreadPoolExecutor.runWorker(ThreadPoolExecutor.java:1145)
at java.util.concurrent.ThreadPoolExecutor$Worker.run(ThreadPoolExecutor.java:615)
at java.lang.Thread.run(Thread.java:745)
Caused by: java.lang.RuntimeException: Could not generate DH keypair
at sun.security.ssl.ECDHCrypt.(ECDHCrypt.java:68)
at sun.security.ssl.ServerHandshaker.setupEphemeralECDHKeys(ServerHandshaker.java:1215)
at sun.security.ssl.ServerHandshaker.trySetCipherSuite(ServerHandshaker.java:1069)
at sun.security.ssl.ServerHandshaker.chooseCipherSuite(ServerHandshaker.java:896)
at sun.security.ssl.ServerHandshaker.clientHello(ServerHandshaker.java:629)
at sun.security.ssl.ServerHandshaker.processMessage(ServerHandshaker.java:167)
at sun.security.ssl.Handshaker.processLoop(Handshaker.java:913)
at sun.security.ssl.Handshaker$1.run(Handshaker.java:853)
at sun.security.ssl.Handshaker$1.run(Handshaker.java:851)
at java.security.AccessController.doPrivileged(Native Method)
at sun.security.ssl.Handshaker$DelegatedTask.run(Handshaker.java:1285)
at org.apache.tomcat.util.net.SecureNioChannel.tasks(SecureNioChannel.java:285)
at org.apache.tomcat.util.net.SecureNioChannel.handshakeUnwrap(SecureNioChannel.java:343)
... 5 more
Caused by: java.security.InvalidAlgorithmParameterException: unknown curve name: 1.2.840.10045.3.1.7
at org.bouncycastle.jce.provider.JDKKeyPairGenerator$EC.initialize(Unknown Source)
at sun.security.ssl.ECDHCrypt.(ECDHCrypt.java:63)
... 17 more
The reason for this is missing JCE policy files in the JDK. So in order to do this, you need to download the relevant JCE policy files from [2] and patch the JDK.
[1] - https://stackoverflow.com/questions/6851461/java-why-does-ssl-handshake-give-could-not-generate-dh-keypair-exception?answertab=votes#tab-top
[2] - http://www.oracle.com/technetwork/java/javase/downloads/jce-7-download-432124.html
TID: [0] [AS] [2017-11-07 05:02:26,655] ERROR {org.apache.tomcat.util.net.NioEndpoint$SocketProcessor} - {org.apache.tomcat.util.net.NioEndpoint$SocketProcessor}
java.lang.RuntimeException: Could not generate DH keypair
at sun.security.ssl.Handshaker.checkThrown(Handshaker.java:1345)
at sun.security.ssl.SSLEngineImpl.checkTaskThrown(SSLEngineImpl.java:519)
at sun.security.ssl.SSLEngineImpl.readNetRecord(SSLEngineImpl.java:796)
at sun.security.ssl.SSLEngineImpl.unwrap(SSLEngineImpl.java:764)
at javax.net.ssl.SSLEngine.unwrap(SSLEngine.java:624)
at org.apache.tomcat.util.net.SecureNioChannel.handshakeUnwrap(SecureNioChannel.java:335)
at org.apache.tomcat.util.net.SecureNioChannel.handshake(SecureNioChannel.java:193)
at org.apache.tomcat.util.net.NioEndpoint$SocketProcessor.run(NioEndpoint.java:1642)
at java.util.concurrent.ThreadPoolExecutor.runWorker(ThreadPoolExecutor.java:1145)
at java.util.concurrent.ThreadPoolExecutor$Worker.run(ThreadPoolExecutor.java:615)
at java.lang.Thread.run(Thread.java:745)
Caused by: java.lang.RuntimeException: Could not generate DH keypair
at sun.security.ssl.ECDHCrypt.
at sun.security.ssl.ServerHandshaker.setupEphemeralECDHKeys(ServerHandshaker.java:1215)
at sun.security.ssl.ServerHandshaker.trySetCipherSuite(ServerHandshaker.java:1069)
at sun.security.ssl.ServerHandshaker.chooseCipherSuite(ServerHandshaker.java:896)
at sun.security.ssl.ServerHandshaker.clientHello(ServerHandshaker.java:629)
at sun.security.ssl.ServerHandshaker.processMessage(ServerHandshaker.java:167)
at sun.security.ssl.Handshaker.processLoop(Handshaker.java:913)
at sun.security.ssl.Handshaker$1.run(Handshaker.java:853)
at sun.security.ssl.Handshaker$1.run(Handshaker.java:851)
at java.security.AccessController.doPrivileged(Native Method)
at sun.security.ssl.Handshaker$DelegatedTask.run(Handshaker.java:1285)
at org.apache.tomcat.util.net.SecureNioChannel.tasks(SecureNioChannel.java:285)
at org.apache.tomcat.util.net.SecureNioChannel.handshakeUnwrap(SecureNioChannel.java:343)
... 5 more
Caused by: java.security.InvalidAlgorithmParameterException: unknown curve name: 1.2.840.10045.3.1.7
at org.bouncycastle.jce.provider.JDKKeyPairGenerator$EC.initialize(Unknown Source)
at sun.security.ssl.ECDHCrypt.
... 17 more
The reason for this is missing JCE policy files in the JDK. So in order to do this, you need to download the relevant JCE policy files from [2] and patch the JDK.
[1] - https://stackoverflow.com/questions/6851461/java-why-does-ssl-handshake-give-could-not-generate-dh-keypair-exception?answertab=votes#tab-top
[2] - http://www.oracle.com/technetwork/java/javase/downloads/jce-7-download-432124.html
Wednesday, September 27, 2017
Transfering PDF files via the VFS transport with WSO2 ESB
This post will explain how one can transfer PDF files through VFS transport within WSO2 ESB.
In this example, I will be providing the configuration which is tested on WSO2 ESB 4.8.1.
In order for you to get the scenario to work, first you will need to enable the VFS sender and listener through the following configuration in the axis2.xml. The below lines will be commented out by default and all you need to do to enable the VFS transport is uncomment the following two entries.
<transportReceiver name="vfs" class="org.apache.synapse.transport.vfs.VFSTransportListener"/>
<transportSender name="vfs" class="org.apache.synapse.transport.vfs.VFSTransportSender"/>
Next, to enable PDF file transferring within ESB, you will have to enable the message relay feature. For this, we need to add the appropriate message builder and formatter to the axis2.xml file.
<messageFormatters>
<messageFormatter contentType="application/pdf" class="org.wso2.carbon.relay.ExpandingMessageFormatter"/>
:
:
</messageFormatters>
<messageBuilders>
<messageBuilder contentType="application/pdf" class="org.wso2.carbon.relay.BinaryRelayBuilder"/>
:
:
</messageBuilders>
Once the above changes have been done, create a Proxy Service as shown below.
<proxy name="PdfProxy" transports="vfs" startOnLoad="true">
<target>
<inSequence>
<log level="custom">
<property name="status=" value="PDF file transferred"/>
</log>
<drop/>
</inSequence>
</target>
<parameter name="transport.vfs.ActionAfterProcess">MOVE</parameter>
<parameter name="transport.PollInterval">15</parameter>
<parameter name="transport.vfs.MoveAfterProcess">file:///Users/evanthika/Downloads/vfs/out</parameter>
<parameter name="transport.vfs.FileURI">file:///Users/evanthika/Downloads/vfs/in</parameter>
<parameter name="transport.vfs.MoveAfterFailure">file:///Users/evanthika/Downloads/vfs/failure</parameter>
<parameter name="transport.vfs.FileNamePattern">.*\.pdf</parameter>
<parameter name="transport.vfs.ContentType">application/pdf</parameter>
<parameter name="transport.vfs.ActionAfterFailure">MOVE</parameter>
</proxy>
Now drop the relevant PDF file to the location mentioned in the transport.vfs.FileURI
parameter. After the time specified in the transport.PollInterval parameter, the relevant PDF file will be read and moved to the folder specified as the transport.vfs.MoveAfterProcess parameter value.
In this example, I will be providing the configuration which is tested on WSO2 ESB 4.8.1.
In order for you to get the scenario to work, first you will need to enable the VFS sender and listener through the following configuration in the axis2.xml. The below lines will be commented out by default and all you need to do to enable the VFS transport is uncomment the following two entries.
<transportReceiver name="vfs" class="org.apache.synapse.transport.vfs.VFSTransportListener"/>
<transportSender name="vfs" class="org.apache.synapse.transport.vfs.VFSTransportSender"/>
Next, to enable PDF file transferring within ESB, you will have to enable the message relay feature. For this, we need to add the appropriate message builder and formatter to the axis2.xml file.
<messageFormatters>
<messageFormatter contentType="application/pdf" class="org.wso2.carbon.relay.ExpandingMessageFormatter"/>
:
:
</messageFormatters>
<messageBuilders>
<messageBuilder contentType="application/pdf" class="org.wso2.carbon.relay.BinaryRelayBuilder"/>
:
:
</messageBuilders>
Once the above changes have been done, create a Proxy Service as shown below.
<proxy name="PdfProxy" transports="vfs" startOnLoad="true">
<target>
<inSequence>
<log level="custom">
<property name="status=" value="PDF file transferred"/>
</log>
<drop/>
</inSequence>
</target>
<parameter name="transport.vfs.ActionAfterProcess">MOVE</parameter>
<parameter name="transport.PollInterval">15</parameter>
<parameter name="transport.vfs.MoveAfterProcess">file:///Users/evanthika/Downloads/vfs/out</parameter>
<parameter name="transport.vfs.FileURI">file:///Users/evanthika/Downloads/vfs/in</parameter>
<parameter name="transport.vfs.MoveAfterFailure">file:///Users/evanthika/Downloads/vfs/failure</parameter>
<parameter name="transport.vfs.FileNamePattern">.*\.pdf</parameter>
<parameter name="transport.vfs.ContentType">application/pdf</parameter>
<parameter name="transport.vfs.ActionAfterFailure">MOVE</parameter>
</proxy>
Now drop the relevant PDF file to the location mentioned in the transport.vfs.FileURI
parameter. After the time specified in the transport.PollInterval parameter, the relevant PDF file will be read and moved to the folder specified as the transport.vfs.MoveAfterProcess parameter value.
Saturday, September 2, 2017
How to accept requests from different URLs that has different query parameters through ESB APIs
Products used - WSO2 ESB 4.8.1
WSO2 DSS 3.5.0
Assume that we have a back-end service which reads a database and returns employee information depending on particular parameters that are being passed. Let's say that we are using the following Data Services Server which is hosted in WSO2 DSS product.
<data name="GetEmployees" transports="http https local">
<config enableOData="false" id="mysql">
<property name="driverClassName">com.mysql.jdbc.Driver</property>
<property name="url">jdbc:mysql://localhost:3306/employee</property>
<property name="username">root</property>
<property name="password">root</property>
</config>
<query id="query1" useConfig="mysql">
<sql>select * from employees where id=? and lastname=?</sql>
<result element="employees" rowName="employee">
<element column="id" name="id" xsdType="string"/>
<element column="lastname" name="lastname" xsdType="string"/>
<element column="firstname" name="firstname" xsdType="string"/>
</result>
<param name="id" sqlType="STRING"/>
<param name="lastname" sqlType="STRING"/>
</query>
<query id="query2" useConfig="mysql">
<sql>select * from employees</sql>
<result element="employees" rowName="employee">
<element column="id" name="id" xsdType="string"/>
<element column="lastname" name="lastname" xsdType="string"/>
<element column="firstname" name="firstname" xsdType="string"/>
</result>
</query>
<query id="query3" useConfig="mysql">
<sql>select * from employees where id=?</sql>
<result element="employees" rowName="employee">
<element column="id" name="id" xsdType="string"/>
<element column="lastname" name="lastname" xsdType="string"/>
<element column="firstname" name="firstname" xsdType="string"/>
</result>
<param name="param0" sqlType="STRING"/>
</query>
<operation name="getemployee">
<call-query href="query1">
<with-param name="id" query-param="id"/>
<with-param name="lastname" query-param="lastname"/>
</call-query>
</operation>
<operation name="getemployeeid">
<call-query href="query3">
<with-param name="param0" query-param="param0"/>
</call-query>
</operation>
<operation name="getAllEmployees">
<call-query href="query2"/>
</operation>
</data>
Lets assume that the client expects to send the requests in the following format.
To get all the employee details of the database - http://localhost:8280/newsample/employee/get/employees
To get employee details which matches a particular id - http://localhost:8280/newsample/employee/get/employees?id={id_number}
To get details of a particular employee which matches a particular id and the lastname - http://localhost:8280/newsample/employee/get/employees?id=1&lastname=Amarasiri
To support this, we can create an API in WSO2 ESB with the following configuration.
<api name="EmployeeDetApi" context="/newsample">
<resource methods="GET"
uri-template="/employee/get/employees?id={id}&lastname={lastname}">
<inSequence>
<payloadFactory media-type="xml">
<format>
<soapenv:Envelope xmlns:soapenv="http://schemas.xmlsoap.org/soap/envelope/"
xmlns:dat="http://ws.wso2.org/dataservice">
<soapenv:Header/>
<soapenv:Body>
<dat:getemployee>
<dat:id>$1</dat:id>
<dat:lastname>$2</dat:lastname>
</dat:getemployee>
</soapenv:Body>
</soapenv:Envelope>
</format>
<args>
<arg evaluator="xml" expression="$url:id"/>
<arg evaluator="xml" expression="$url:lastname"/>
</args>
</payloadFactory>
<property name="SOAPAction"
value="urn:getemployee"
scope="transport"
type="STRING"/>
<property name="ContentType" value="text/xml" scope="axis2" type="STRING"/>
<log>
<property name="incoming_message"
value="*******GET EMPLOYEE DETAILS - id ,lastname *******"/>
</log>
<send>
<endpoint key="AddressEpr"/>
</send>
</inSequence>
</resource>
<resource methods="GET" uri-template="/employee/get/employees?id={param0}">
<inSequence>
<payloadFactory media-type="xml">
<format>
<soapenv:Envelope xmlns:soapenv="http://schemas.xmlsoap.org/soap/envelope/"
xmlns:dat="http://ws.wso2.org/dataservice">
<soapenv:Header/>
<soapenv:Body>
<dat:getemployeeid>
<dat:param0>$1</dat:param0>
</dat:getemployeeid>
</soapenv:Body>
</soapenv:Envelope>
</format>
<args>
<arg evaluator="xml" expression="$url:id"/>
</args>
</payloadFactory>
<property name="SOAPAction"
value="urn:getemployeeid"
scope="transport"
type="STRING"/>
<property name="ContentType" value="text/xml" scope="axis2" type="STRING"/>
<log>
<property name="incoming_message"
value="*******GET EMPLOYEE DETAILS - id *******"/>
</log>
<send>
<endpoint key="AddressEpr"/>
</send>
</inSequence>
</resource>
<resource methods="GET" uri-template="/employee/get/employees">
<inSequence>
<payloadFactory media-type="xml">
<format>
<soapenv:Envelope xmlns:soapenv="http://schemas.xmlsoap.org/soap/envelope/"
xmlns:dat="http://ws.wso2.org/dataservice">
<soapenv:Header/>
<soapenv:Body>
<dat:getAllEmployees/>
</soapenv:Body>
</soapenv:Envelope>
</format>
<args/>
</payloadFactory>
<property name="SOAPAction"
value="urn:getemployeedetails"
scope="transport"
type="STRING"/>
<property name="ContentType" value="text/xml" scope="axis2" type="STRING"/>
<log>
<property name="incoming_message"
value="*******GET EMPLOYEE DETAILS - All employees details *******”/>
</log>
<send>
<endpoint key="AddressEpr"/>
</send>
</inSequence>
</resource>
</api>
WSO2 DSS 3.5.0
Assume that we have a back-end service which reads a database and returns employee information depending on particular parameters that are being passed. Let's say that we are using the following Data Services Server which is hosted in WSO2 DSS product.
<data name="GetEmployees" transports="http https local">
<config enableOData="false" id="mysql">
<property name="driverClassName">com.mysql.jdbc.Driver</property>
<property name="url">jdbc:mysql://localhost:3306/employee</property>
<property name="username">root</property>
<property name="password">root</property>
</config>
<query id="query1" useConfig="mysql">
<sql>select * from employees where id=? and lastname=?</sql>
<result element="employees" rowName="employee">
<element column="id" name="id" xsdType="string"/>
<element column="lastname" name="lastname" xsdType="string"/>
<element column="firstname" name="firstname" xsdType="string"/>
</result>
<param name="id" sqlType="STRING"/>
<param name="lastname" sqlType="STRING"/>
</query>
<query id="query2" useConfig="mysql">
<sql>select * from employees</sql>
<result element="employees" rowName="employee">
<element column="id" name="id" xsdType="string"/>
<element column="lastname" name="lastname" xsdType="string"/>
<element column="firstname" name="firstname" xsdType="string"/>
</result>
</query>
<query id="query3" useConfig="mysql">
<sql>select * from employees where id=?</sql>
<result element="employees" rowName="employee">
<element column="id" name="id" xsdType="string"/>
<element column="lastname" name="lastname" xsdType="string"/>
<element column="firstname" name="firstname" xsdType="string"/>
</result>
<param name="param0" sqlType="STRING"/>
</query>
<operation name="getemployee">
<call-query href="query1">
<with-param name="id" query-param="id"/>
<with-param name="lastname" query-param="lastname"/>
</call-query>
</operation>
<operation name="getemployeeid">
<call-query href="query3">
<with-param name="param0" query-param="param0"/>
</call-query>
</operation>
<operation name="getAllEmployees">
<call-query href="query2"/>
</operation>
</data>
Lets assume that the client expects to send the requests in the following format.
To get all the employee details of the database - http://localhost:8280/newsample/employee/get/employees
To get employee details which matches a particular id - http://localhost:8280/newsample/employee/get/employees?id={id_number}
To get details of a particular employee which matches a particular id and the lastname - http://localhost:8280/newsample/employee/get/employees?id=1&lastname=Amarasiri
To support this, we can create an API in WSO2 ESB with the following configuration.
<api name="EmployeeDetApi" context="/newsample">
<resource methods="GET"
uri-template="/employee/get/employees?id={id}&lastname={lastname}">
<inSequence>
<payloadFactory media-type="xml">
<format>
<soapenv:Envelope xmlns:soapenv="http://schemas.xmlsoap.org/soap/envelope/"
xmlns:dat="http://ws.wso2.org/dataservice">
<soapenv:Header/>
<soapenv:Body>
<dat:getemployee>
<dat:id>$1</dat:id>
<dat:lastname>$2</dat:lastname>
</dat:getemployee>
</soapenv:Body>
</soapenv:Envelope>
</format>
<args>
<arg evaluator="xml" expression="$url:id"/>
<arg evaluator="xml" expression="$url:lastname"/>
</args>
</payloadFactory>
<property name="SOAPAction"
value="urn:getemployee"
scope="transport"
type="STRING"/>
<property name="ContentType" value="text/xml" scope="axis2" type="STRING"/>
<log>
<property name="incoming_message"
value="*******GET EMPLOYEE DETAILS - id ,lastname *******"/>
</log>
<send>
<endpoint key="AddressEpr"/>
</send>
</inSequence>
</resource>
<resource methods="GET" uri-template="/employee/get/employees?id={param0}">
<inSequence>
<payloadFactory media-type="xml">
<format>
<soapenv:Envelope xmlns:soapenv="http://schemas.xmlsoap.org/soap/envelope/"
xmlns:dat="http://ws.wso2.org/dataservice">
<soapenv:Header/>
<soapenv:Body>
<dat:getemployeeid>
<dat:param0>$1</dat:param0>
</dat:getemployeeid>
</soapenv:Body>
</soapenv:Envelope>
</format>
<args>
<arg evaluator="xml" expression="$url:id"/>
</args>
</payloadFactory>
<property name="SOAPAction"
value="urn:getemployeeid"
scope="transport"
type="STRING"/>
<property name="ContentType" value="text/xml" scope="axis2" type="STRING"/>
<log>
<property name="incoming_message"
value="*******GET EMPLOYEE DETAILS - id *******"/>
</log>
<send>
<endpoint key="AddressEpr"/>
</send>
</inSequence>
</resource>
<resource methods="GET" uri-template="/employee/get/employees">
<inSequence>
<payloadFactory media-type="xml">
<format>
<soapenv:Envelope xmlns:soapenv="http://schemas.xmlsoap.org/soap/envelope/"
xmlns:dat="http://ws.wso2.org/dataservice">
<soapenv:Header/>
<soapenv:Body>
<dat:getAllEmployees/>
</soapenv:Body>
</soapenv:Envelope>
</format>
<args/>
</payloadFactory>
<property name="SOAPAction"
value="urn:getemployeedetails"
scope="transport"
type="STRING"/>
<property name="ContentType" value="text/xml" scope="axis2" type="STRING"/>
<log>
<property name="incoming_message"
value="*******GET EMPLOYEE DETAILS - All employees details *******”/>
</log>
<send>
<endpoint key="AddressEpr"/>
</send>
</inSequence>
</resource>
</api>
Wednesday, July 26, 2017
Analysing data with Data Analytics Server
When we talk about WSO2 DAS there are a few important things we need to give focus to. They are, Event receivers, Event Streams, Event Stream definitions and Event Stores.
Events, are units of data, that are received by WSO2 DAS using Event Receivers. Through these Event Receivers WSO2 DAS receives events from different transports in JSON, XML, WSO2 Event formats, etc. formats. There are many different Event receivers available in WSO2 DAS, such as HTTP Event Receivers, SOAP Event Receivers, WSO2Event Event Receivers, etc.
Event Streams are known to be a sequence of events of a particular type. The “type” in this context can be defined as an event stream definition.
An Event Stream definition is sort of a schema which describes in which format the events that comes into WSO2 DAS server should be in. Each Event Stream Definition would have a name, a version and most importantly the type of the data that it expects to be sent in to WSO2 DAS as Events.
Once an event is received by the Event Receiver, it would be checked against the Event Stream definition and be persisted to an Event Store. This is happening through the Data Analytics Layer (DAL) where the events will be stored in the Event store (can be a relational database) as a BLOB which is in human unreadable format. Then these events will be analyzed and processed and the processed information will then again be store in a Process Store (This too can be a relational database) in a BLOB format.
These analyzed data will be decrypted by DAL and presented in a human readable format through the Data Explorer of WSO2 DAS.
When it comes to IS Analytics, whatever the analyzed data that are in the Process Store will be presented through the Analytics Dashboard which is available in WSO2 DAS after the data being decrypted from DAL.
However, the API Manager Analytics are visible from the Store/Publisher portals that are shipped with the API Manager product. However, the API manager related events that are stored in the Process store cannot be read directly from the API Manager dashboards as they are in a encrypted format. Only a DAL can decrypt this information into a human readable format. Because of this, we have introduced a way which is using a method called carbonJDBC where the DAL converts these information that are in the process store and store them in an external relational database. This database is then pointed to, from the API Manager dashboards and you will see API Manager analytics accordingly.
Events, are units of data, that are received by WSO2 DAS using Event Receivers. Through these Event Receivers WSO2 DAS receives events from different transports in JSON, XML, WSO2 Event formats, etc. formats. There are many different Event receivers available in WSO2 DAS, such as HTTP Event Receivers, SOAP Event Receivers, WSO2Event Event Receivers, etc.
Event Streams are known to be a sequence of events of a particular type. The “type” in this context can be defined as an event stream definition.
An Event Stream definition is sort of a schema which describes in which format the events that comes into WSO2 DAS server should be in. Each Event Stream Definition would have a name, a version and most importantly the type of the data that it expects to be sent in to WSO2 DAS as Events.
Once an event is received by the Event Receiver, it would be checked against the Event Stream definition and be persisted to an Event Store. This is happening through the Data Analytics Layer (DAL) where the events will be stored in the Event store (can be a relational database) as a BLOB which is in human unreadable format. Then these events will be analyzed and processed and the processed information will then again be store in a Process Store (This too can be a relational database) in a BLOB format.
These analyzed data will be decrypted by DAL and presented in a human readable format through the Data Explorer of WSO2 DAS.
When it comes to IS Analytics, whatever the analyzed data that are in the Process Store will be presented through the Analytics Dashboard which is available in WSO2 DAS after the data being decrypted from DAL.
However, the API Manager Analytics are visible from the Store/Publisher portals that are shipped with the API Manager product. However, the API manager related events that are stored in the Process store cannot be read directly from the API Manager dashboards as they are in a encrypted format. Only a DAL can decrypt this information into a human readable format. Because of this, we have introduced a way which is using a method called carbonJDBC where the DAL converts these information that are in the process store and store them in an external relational database. This database is then pointed to, from the API Manager dashboards and you will see API Manager analytics accordingly.
Tuesday, June 13, 2017
How to resolve "Un-recognized attribute 'targetFramework'. Note that attribute names are case-sensitive." in IIS
While trying to configure a SOAP service in IIS, I came across various issues where I had to do many things to resolve them. One of them is the following issue.
Server Error in '/' Application.
Configuration Error
Description: An error occurred during the processing of a configuration file required to service this request. Please review the specific error details below and modify your configuration file appropriately.
Parser Error Message: Un-recognized attribute 'targetFramework'. Note that attribute names are case-sensitive.
Source Error:
Line 3:
Line 4:
Line 5:
Line 6:
Line 7:
Source File: C:\RestService\RestService2\RestService\web.config Line: 5
Version Information: Microsoft .NET Framework Version:2.0.50727.5420; ASP.NET Version:2.0.50727.5459
To resolve this issue, what you need to do is, check whether you have installed ASP.NET 4 on your Windows instance.
If it is installed, open up a command window, go to the location where .NET 4 is available,
C:\Users\Administrator>cd C:\Windows\Microsoft.NET\Framework\v4.0.30319
Then run the following command
aspnet_regiis -i
E.g.:- C:\Windows\Microsoft.NET\Framework\v4.0.30319>aspnet_regiis -i
Once this is done, open your IIS (type inetmgr in run) and change your Application pool setting to .Net4 (Go to Application Pools -> click on your project -> Right click and select 'Basic Settings')

Server Error in '/' Application.
Configuration Error
Description: An error occurred during the processing of a configuration file required to service this request. Please review the specific error details below and modify your configuration file appropriately.
Parser Error Message: Un-recognized attribute 'targetFramework'. Note that attribute names are case-sensitive.
Source Error:
Line 3:
Line 4:
Line 5:
Line 6:
Line 7:
Source File: C:\RestService\RestService2\RestService\web.config Line: 5
Version Information: Microsoft .NET Framework Version:2.0.50727.5420; ASP.NET Version:2.0.50727.5459
To resolve this issue, what you need to do is, check whether you have installed ASP.NET 4 on your Windows instance.
If it is installed, open up a command window, go to the location where .NET 4 is available,
C:\Users\Administrator>cd C:\Windows\Microsoft.NET\Framework\v4.0.30319
Then run the following command
aspnet_regiis -i
E.g.:- C:\Windows\Microsoft.NET\Framework\v4.0.30319>aspnet_regiis -i
Once this is done, open your IIS (type inetmgr in run) and change your Application pool setting to .Net4 (Go to Application Pools -> click on your project -> Right click and select 'Basic Settings')
Sunday, June 11, 2017
Where do we have the public GIT repos for XACML and XACML Mediation Feature?
If you want to do changes to the
XACML and XACML mediation features and use it within your product, you can get the code from the below locations.
XACML
https://github.com/wso2/carbon-identity-framework/tree/master/features/xacml
XACML Mediation Feature https://github.com/wso2/carbon-mediation/tree/master/components/mediators/entitlement/org.wso2.carbon.identity.entitlement.mediator
XACML
https://github.com/wso2/carbon-identity-framework/tree/master/features/xacml
XACML Mediation Feature https://github.com/wso2/carbon-mediation/tree/master/components/mediators/entitlement/org.wso2.carbon.identity.entitlement.mediator
Monday, June 5, 2017
Some important grep commands
While working on day to day work, there are many important grep commands that comes in handy. Below are some of these commands.
- How to find the number of occurrences of a particular text in a file.
grep -o "text to be searchd" nohup.out | wc -l
This blog is yet to be developed and I will add one by one when I come across them.
Sunday, June 4, 2017
How does thread switching happen in WSO2 ESB (Switching between ServerWorker & IO reactor threads)
One of the most important things we need to understand when working with WSO2 ESB is it's threading model. There are two types of threads that does the main functionality within the ESB.
a) SynapseWorker threads
b) IO Reactor Threads
Out of these two threads, the SynapseWorker threads handles whatever the operations related to message mediation. On the other hand, the IO reactor threads are available for event handling such as receiving message headers, receiving message body, etc.
Inside the Synapse engine, the message would go through many classes where transformations that are required are done to the incoming message. The classes involved in this flow are explained in a previous post which I have written.
Once the message mediation is done, it is passed onto the Axis2Engine where it's receive() method is called. Inside this method, the type of the receiver is read from the context. In this example, since we are sending the message to a Proxy service, the receiver would be set to ProxyServiceMessageReceiver. So the message context would be passed on to the receive method of the ProxyServiceMessageReceiver class.
This is the point where the incoming message is passed onto the Synapse Engine.

After the mediation flow completes for the incoming message inside the mediation engine, it would be handed over to the PassThroughHttpSender where the outbound HTTP requests can be sent.
The PassThroughHttpSender implements the TransportSender interface. The initialisation of the PassThroughHttpSender happens at the server startup and an instance of the NHttpClientEventHandler is created by the name TargetHandler.
In addition to this, when the PassThroughHttpSender is initialised, it creates an instance of the DefaultConnectingIOReactor as well.
Along with this an instance of the DeliveryAgent is also formed which allows storing of messages for later delivery.
If a connection is available to send the message it would send the message right away and if not, it would put the message to a message queue to be delivered to the backend whenever a connection is available. This implementation is available inside the submit() method of the DeliveryAgent class.
When the message comes in the PassThroughHttpSender it hits it's invoke() method. After removing unwanted headers sent through the request, it would then check the messageContext for the endpoint value sent in the request message.
If an endpoint is passed in from the request, the submit() method of the DeliveryAgent class is called. If no endpoint is sent, it would call the submitResponse() method.
In this scenario, since we have specified an endpoint value, I would explain the flow which continues from the submit() method of the DeliveryAgent class.

Inside the submit() method, it would add the incoming message to a queue as shown below.

Once the message is added to the queue, it would call the getConnection() method of the TargetConnections class. This would return a connection if already available or won't return anything and will notify the delivery agent when a connection is available.

In a scenario where a connection is available, the connected() method of the TargetHandler is called and also a new TargetContext is created and the Protocol state is set to REQUEST_READY. which means that the connection is at the initial stage and is ready to receive a request.

Next the connected() method of the DeliveryAgent class is invoked where it would check the queue for any messages and pass onto the tryNextMessage() method.

Inside this method, the TargetConext will be updated with the status REQUEST_READY. At the same time, the TargetContext will be set with the messageContext and then the message will be sent to the submitRequest() method.

When the submitRequest() method is called, it would create a TargetRequest and attach it to the TargetContext.

Next is the invocation of the requestReady() method of the TargetHandler class where the HTTP headers are written to the TargetRequest.


Then the outputReady() of the TargetHandler is called; where the write() method of the TargetRequest is hit.

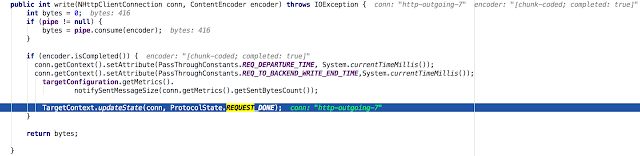
In this method, it reads the data that was written before to the pipe and writes it to the wire. Once this is done, the Protocol status is also updated to REQUEST_DONE.
There you go! Now you know how the request messages are being passed on from the Worker threads to the IO threads within WSO2 ESB.
a) SynapseWorker threads
b) IO Reactor Threads
Out of these two threads, the SynapseWorker threads handles whatever the operations related to message mediation. On the other hand, the IO reactor threads are available for event handling such as receiving message headers, receiving message body, etc.
Inside the Synapse engine, the message would go through many classes where transformations that are required are done to the incoming message. The classes involved in this flow are explained in a previous post which I have written.
Once the message mediation is done, it is passed onto the Axis2Engine where it's receive() method is called. Inside this method, the type of the receiver is read from the context. In this example, since we are sending the message to a Proxy service, the receiver would be set to ProxyServiceMessageReceiver. So the message context would be passed on to the receive method of the ProxyServiceMessageReceiver class.
This is the point where the incoming message is passed onto the Synapse Engine.

After the mediation flow completes for the incoming message inside the mediation engine, it would be handed over to the PassThroughHttpSender where the outbound HTTP requests can be sent.
The PassThroughHttpSender implements the TransportSender interface. The initialisation of the PassThroughHttpSender happens at the server startup and an instance of the NHttpClientEventHandler is created by the name TargetHandler.
In addition to this, when the PassThroughHttpSender is initialised, it creates an instance of the DefaultConnectingIOReactor as well.
Along with this an instance of the DeliveryAgent is also formed which allows storing of messages for later delivery.
If a connection is available to send the message it would send the message right away and if not, it would put the message to a message queue to be delivered to the backend whenever a connection is available. This implementation is available inside the submit() method of the DeliveryAgent class.
When the message comes in the PassThroughHttpSender it hits it's invoke() method. After removing unwanted headers sent through the request, it would then check the messageContext for the endpoint value sent in the request message.
If an endpoint is passed in from the request, the submit() method of the DeliveryAgent class is called. If no endpoint is sent, it would call the submitResponse() method.
In this scenario, since we have specified an endpoint value, I would explain the flow which continues from the submit() method of the DeliveryAgent class.

Inside the submit() method, it would add the incoming message to a queue as shown below.

Once the message is added to the queue, it would call the getConnection() method of the TargetConnections class. This would return a connection if already available or won't return anything and will notify the delivery agent when a connection is available.

In a scenario where a connection is available, the connected() method of the TargetHandler is called and also a new TargetContext is created and the Protocol state is set to REQUEST_READY. which means that the connection is at the initial stage and is ready to receive a request.

Next the connected() method of the DeliveryAgent class is invoked where it would check the queue for any messages and pass onto the tryNextMessage() method.

Inside this method, the TargetConext will be updated with the status REQUEST_READY. At the same time, the TargetContext will be set with the messageContext and then the message will be sent to the submitRequest() method.

When the submitRequest() method is called, it would create a TargetRequest and attach it to the TargetContext.

Next is the invocation of the requestReady() method of the TargetHandler class where the HTTP headers are written to the TargetRequest.


Then the outputReady() of the TargetHandler is called; where the write() method of the TargetRequest is hit.

In this method, it reads the data that was written before to the pipe and writes it to the wire. Once this is done, the Protocol status is also updated to REQUEST_DONE.

There you go! Now you know how the request messages are being passed on from the Worker threads to the IO threads within WSO2 ESB.
Sunday, May 28, 2017
How to send an email with a text that has new lines (\n) in ESB 5.0.0
Hello world!!!
My Name is Evanthika Amarasiri.
I work for the support team.
I need to send this email in the above format with new lines between each sentence.
How can we make this possible with WSO2 ESB?
So to support this, what you first need is to configure the WSO2 ESB to support email sending. This can be done by following the configuration mentioned in our product documentation.
Once done, start up the ESB server and create a Proxy service with the following configuration.
<?xml version="1.0" encoding="UTF-8"?>
<proxy xmlns="http://ws.apache.org/ns/synapse"
name="EmailSender"
transports="https http"
startOnLoad="true">
<description/>
<target>
<endpoint>
<address uri="http://localhost:9000/services/SimpleStockQuoteService"/>
</endpoint>
<inSequence>
<log/>
<property name="messageType" value="text/xml" scope="axis2" type="STRING"/>
<property name="ContentType" value="text/xml" scope="axis2"/>
<property name="Subject" value="Testing ESB" scope="transport"/>
<property name="OUT_ONLY" value="true"/>
<property name="FORCE_SC_ACCEPTED" value="true" scope="axis2"/>
<payloadFactory media-type="xml">
<format>
<ns:text xmlns:ns="http://ws.apache.org/commons/ns/payload">$1</ns:text>
</format>
<args>
<arg evaluator="xml"
expression="concat('Hello world!!!',' ',' ', 'My Name is Evanthika Amarasiri.',' ',' ', 'I work for the support team.')"/>
</args>
</payloadFactory>
<log level="full"/>
<send>
<endpoint>
<address uri="mailto:evanthika@wso2.com"/>
</endpoint>
</send>
</inSequence>
<outSequence>
<send/>
</outSequence>
</target>
</proxy>
Note the below line that is inside the PayloadFactory mediator.
<arg evaluator="xml" expression="concat('Hello world!!!', ' ',' ', 'My Name is Evanthika Amarasiri.',' ',' ', 'I work for the support team.')"/>
To support new lines what you need to add is ' ' in between the text you want the new line to be.
Once the above proxy service is deployed, send a request to the proxy service and you should get an email attachment with the below content.

Friday, May 26, 2017
Validating JSON arrays when the payload is sent as a query parameter with WSO2 ESB
In my previous post, I explained how JSON payloads can be validated when it's sent as a query parameter. Using the same Synapse configuration without doing any changes, we will see how JSON arrays can be validated by tweaking the JSON schema.
Assume that my requirement is to send a JSON array as a query parameter as shown below.
http://localhost:8280/jsonAPI/jsonapi?jsonPayload=[{"getQuote": {"request": {"symbol": "WSO2"}}},{"getQuote": {"request": {"symbol": "MSFT"}}}]
Create an API using the same configuration which we have used in the previous post.
<api context="/jsonAPI" name="jsonAPI">
<resource methods="GET" protocol="http" uri-template="/jsonapi">
<inSequence>
<property expression="$url:jsonPayload"
name="jsonKeyValue" scope="default" type="STRING"/>
<payloadFactory media-type="json">
<format>$1</format>
<args>
<arg evaluator="xml" expression="get-property('jsonKeyValue')"/>
</args>
</payloadFactory>
<validate>
<schema key="conf:/schema/StockQuoteSchema.json"/>
<on-fail>
<payloadFactory media-type="json">
<format>{"Error":"$1"}</format>
<args>
<arg evaluator="xml" expression="$ctx:ERROR_MESSAGE"/>
</args>
</payloadFactory>
<respond/>
</on-fail>
</validate>
<respond/>
</inSequence>
</resource>
</api>
The StockQuoteSchema.json which you have created under the path conf:/schema/StockQuoteSchema.json should be written in the following format.
{
"$schema": "http://json-schema.org/draft-04/schema#",
"type": "array",
"items": [{
"getQuote": {
"type": "object",
"properties": {
"request": {
"type": "object",
"properties": {
"symbol": {
"type": "string"
}
},
"required": [
"symbol"
]
}
},
"required": [
"request"
]
}
}],
"required": [
"getQuote"
]
}
Note the text marked in blue. In the previous example, when a simple JSON payload was sent, the value of the type was set to object whereas in this scenario, since it's handling JSON arrays, it should be set to array.
On the other hand, since your JSON payload is sending an array, the schema should list elements to be checked inside a block called items with the JSON body wrapped inside square brackets i.e.; [] as highlighted above.
So once the above configuration is done, and the GET request is sent to the API, you should see the following output if everything goes well.
[
{
"getQuote": {
"request": {
"symbol": "WSO2"
}
}
},
{
"getQuote": {
"request": {
"symbol": "MSFT"
}
}
}
]
Assume that my requirement is to send a JSON array as a query parameter as shown below.
http://localhost:8280/jsonAPI/jsonapi?jsonPayload=[{"getQuote": {"request": {"symbol": "WSO2"}}},{"getQuote": {"request": {"symbol": "MSFT"}}}]
Create an API using the same configuration which we have used in the previous post.
<api context="/jsonAPI" name="jsonAPI">
<resource methods="GET" protocol="http" uri-template="/jsonapi">
<inSequence>
<property expression="$url:jsonPayload"
name="jsonKeyValue" scope="default" type="STRING"/>
<payloadFactory media-type="json">
<format>$1</format>
<args>
<arg evaluator="xml" expression="get-property('jsonKeyValue')"/>
</args>
</payloadFactory>
<validate>
<schema key="conf:/schema/StockQuoteSchema.json"/>
<on-fail>
<payloadFactory media-type="json">
<format>{"Error":"$1"}</format>
<args>
<arg evaluator="xml" expression="$ctx:ERROR_MESSAGE"/>
</args>
</payloadFactory>
<respond/>
</on-fail>
</validate>
<respond/>
</inSequence>
</resource>
</api>
The StockQuoteSchema.json which you have created under the path conf:/schema/StockQuoteSchema.json should be written in the following format.
{
"$schema": "http://json-schema.org/draft-04/schema#",
"type": "array",
"items": [{
"getQuote": {
"type": "object",
"properties": {
"request": {
"type": "object",
"properties": {
"symbol": {
"type": "string"
}
},
"required": [
"symbol"
]
}
},
"required": [
"request"
]
}
}],
"required": [
"getQuote"
]
}
Note the text marked in blue. In the previous example, when a simple JSON payload was sent, the value of the type was set to object whereas in this scenario, since it's handling JSON arrays, it should be set to array.
On the other hand, since your JSON payload is sending an array, the schema should list elements to be checked inside a block called items with the JSON body wrapped inside square brackets i.e.; [] as highlighted above.
So once the above configuration is done, and the GET request is sent to the API, you should see the following output if everything goes well.
[
{
"getQuote": {
"request": {
"symbol": "WSO2"
}
}
},
{
"getQuote": {
"request": {
"symbol": "MSFT"
}
}
}
]
Thursday, May 25, 2017
Validating JSON payloads when the payload is sent as a query parameter in WSO2 ESB
In cases where we want to validate a JSON payload against a particular schema that is being sent by the client before sending it to the backend, we can use the Validate mediator of WSO2 ESB. This support has been added from WSO2 ESB v5.0.0 onward. The samples given in the WSO2 ESB documentation are for scenarios where the JSON payload is sent as a message body.
However, if the JSON payload is being sent as a query parameter, the configuration given in the samples will not work and we will have to tweak the configuration to support this. Given below is an example scenario which explains this in detail.
I have an API deployed in WSO2 ESB which does a GET call by passing the JSON message payload as a query parameter.
http://localhost:8280/jsonAPI/jsonapi?jsonPayload={"getQuote": {"request": {"symbol": "WSO2"}}}
The schema (StockQuoteSchema.json) used to validate the incoming payload is as below. Note that this schema is saved in the registry under the path /_system/config/schema
{
"$schema": "http://json-schema.org/draft-04/schema#",
"type": "object",
"properties": {
"getQuote": {
"type": "object",
"properties": {
"request": {
"type": "object",
"properties": {
"symbol": {
"type": "string"
}
},
"required": [
"symbol"
]
}
},
"required": [
"request"
]
}
},
"required": [
"getQuote"
]
}
To validate the JSON object passed as a query parameter in the URL from the parameter jsonPayload the following API configuration should be used.
<api context="/jsonAPI" name="jsonAPI">
<resource methods="GET" protocol="http" uri-template="/jsonapi">
<inSequence>
<property expression="$url:jsonPayload"
name="jsonKeyValue" scope="default" type="STRING"/>
<payloadFactory media-type="json">
<format>$1</format>
<args>
<arg evaluator="xml" expression="get-property('jsonKeyValue')"/>
</args>
</payloadFactory>
<validate>
<schema key="conf:/schema/StockQuoteSchema.json"/>
<on-fail>
<payloadFactory media-type="json">
<format>{"Error":"$1"}</format>
<args>
<arg evaluator="xml" expression="$ctx:ERROR_MESSAGE"/>
</args>
</payloadFactory>
<respond/>
</on-fail>
</validate>
<respond/>
</inSequence>
</resource>
</api>
With this Synapse configuration in place, the validation should happen flawlessly.
However, if the JSON payload is being sent as a query parameter, the configuration given in the samples will not work and we will have to tweak the configuration to support this. Given below is an example scenario which explains this in detail.
I have an API deployed in WSO2 ESB which does a GET call by passing the JSON message payload as a query parameter.
http://localhost:8280/jsonAPI/jsonapi?jsonPayload={"getQuote": {"request": {"symbol": "WSO2"}}}
The schema (StockQuoteSchema.json) used to validate the incoming payload is as below. Note that this schema is saved in the registry under the path /_system/config/schema
{
"$schema": "http://json-schema.org/draft-04/schema#",
"type": "object",
"properties": {
"getQuote": {
"type": "object",
"properties": {
"request": {
"type": "object",
"properties": {
"symbol": {
"type": "string"
}
},
"required": [
"symbol"
]
}
},
"required": [
"request"
]
}
},
"required": [
"getQuote"
]
}
To validate the JSON object passed as a query parameter in the URL from the parameter jsonPayload the following API configuration should be used.
<api context="/jsonAPI" name="jsonAPI">
<resource methods="GET" protocol="http" uri-template="/jsonapi">
<inSequence>
<property expression="$url:jsonPayload"
name="jsonKeyValue" scope="default" type="STRING"/>
<payloadFactory media-type="json">
<format>$1</format>
<args>
<arg evaluator="xml" expression="get-property('jsonKeyValue')"/>
</args>
</payloadFactory>
<validate>
<schema key="conf:/schema/StockQuoteSchema.json"/>
<on-fail>
<payloadFactory media-type="json">
<format>{"Error":"$1"}</format>
<args>
<arg evaluator="xml" expression="$ctx:ERROR_MESSAGE"/>
</args>
</payloadFactory>
<respond/>
</on-fail>
</validate>
<respond/>
</inSequence>
</resource>
</api>
With this Synapse configuration in place, the validation should happen flawlessly.
Tuesday, May 23, 2017
Mediation flow of WSO2 ESB
WSO2 ESB is one of the most important products in the WSO2 product stacks which enables users to do all sorts of transformations. Instead of having to make each of your applications communicate directly with each other in all their various formats, each application simply communicates with the WSO2 ESB, which handles transforming and routing the messages to their appropriate destinations. While working with this product, we believe it is important to understand how the messages flow through ESB. So when a message comes inside ESB, it goes through the transport layer and then the Axis2 engine which converts the incoming message into a SOAP envelope.
Once converted, it is then handed over to the Mediation engine, which is considered as the backbone of the product. This is where all the mediation work happens. In this post, I will be explaining in detail what happens to a message which comes inside ESB and the path it takes until a response is delivered back to the client.
To explain the scenario, I will use the below Proxy Service which talks to a simple back-end and logs a message in the inSequence as well as the outSequence.
<proxy name="DebugProxy" startOnLoad="true" transports="https http">
<description/>
<target>
<endpoint>
<address uri="http://localhost:9000/services/SimpleStockQuoteService"/>
</endpoint>
<inSequence>
<log level="full">
<property name="IN_SEQ" value="Executing In Sequence"/>
</log>
</inSequence>
<outSequence>
<log level="full">
<property name="OUT_SEQ" value="Inside the out sequence"/>
</log>
<send/>
</outSequence>
<faultSequence>
<log level="full">
<property name="FAULT_SEQ" value="Inside Fault Sequence"/>
</log>
</faultSequence>
</target>
</proxy>
The entry point to the mediation engine for a message which comes in to a Proxy Service, is the receive method of the ProxyServiceMessageReceiver while for the message out-flow, the entry point is SynapseCallbackReceiver. Below I've listed down each method that is being called in each class inside the Mediation engine.
In-flow

Out-flow

Tuesday, April 25, 2017
Enabling SSL Tunneling through a Squid Proxy Server with authentication
This post will describe how we can proxy our outgoing requests through ESB using a Squid Proxy Server. For more information on the scenario, you can refer the WSO2 ESB documentation.
Step 1 - Setting up Squid Proxy Server
To setup a Squid Proxy Server locally, you can follow the instructions available here.
Step 2 - Configuring Squid Proxy Server - updating the squid.conf file
Add the following line under the acl section
acl squid.proxy.server src appserver.wso2.com
Note: If you will not be able to start the squid server with the above config, you might have to set an /etc/hosts entry for the host appserver.wso2.com.
The following should be added before the http_access TAG
http_access allow squid.proxy.server
Note: We will be referring to this proxy server instance by the name squid.proxy.server. Hence, you need to add this entry to the /etc/hosts file which resides in your local instance as well as to the instance where the Squid server is running.
Add the following port information before the https_port TAG section
http_port 8888
Once the above is added to the squid.conf file, restart the Squid server
sudo service squid3 restart
Step 3 - Enabling the proxy configuration in WSO2 ESB
To do this, add the below configuation to the axis2.xml under the PassThroughHttpSender, PassThroughHttpSSLSender configuration
<parameter name="http.proxyHost" locked="false">squid.proxy.server</parameter> <parameter name="http.proxyPort" locked="false">8888</parameter>
Step 4 - Creating a Proxy Service
Once the above configurations are done and the WSO2 ESB server is restarted, you can create a simple Passthrough Proxy service to test the scenario.
Note that as the endpoint, I am using a backend where I'm referring to from a host name called appserver.wso2.com. This was the hostname which we added to the squid.conf file above under the acl section.
<proxy name="SSLTunnelingProxy"
transports="https http"
startOnLoad="true"
trace="disable">
<description/>
<target>
<inSequence>
<send>
<endpoint>
<address uri="https://appserver.wso2.com/services/SimpleStockQuoteService"/>
</endpoint>
</send>
</inSequence>
<outSequence>
<send/>
</outSequence>
</target>
</proxy>
Step 5 - Setting up the backend
For this scenario, you can take an WSO2 Application Server instance and start it up with ports 443 and 80 as default ports. Then, set the HostName parameter in carbon.xml to appserver.wso2.com. Deploy the SimpleStockQuoteService and you are ready to go.
Step 6 - Invoking the Proxy Service
Using a preferred client of yours you can test the scenario. If the message is sent through the Proxy server, you should see logs as shown below in /var/logs/squid/access.log file.
1493112155.126 49234 127.0.0.1 TCP_MISS/200 2335 CONNECT appserver.wso2.com:443 - HIER_DIRECT/192.168.53.176 -
1493112888.241 0 10.100.7.144 TCP_DENIED_REPLY/403 3429 CONNECT appserver.wso2.com:443 - HIER_NONE/- text/html
Step 7 - Configure authentication in Squid
To enable authentication in Squid, the following configuration needs to be done.
Add the following to the squid.conf profile under TAG: auth_param
auth_param basic program /usr/lib/squid3/ncsa_auth /etc/squid3/passwords
auth_param basic realm proxy
Note: In ubuntu 12 - the file should be ncsa_auth & in ubuntu 14 - the file is basic_ncsa_auth.
Next, under the TAG: acl add the following
acl authenticated proxy_auth REQUIRED
The following should be added under the TAG: http_access.
http_access allow authenticated
Step 8 - Setting up a user
As a pre-requisite Apache2 Utils will have to be installed.
sudo apt-get install apache2-utils
To create a new user, use the following command.
sudo htpasswd -c /etc/squid3/passwords <>
When it prompts for the password, specify a password of your choice.
Step 1 - Setting up Squid Proxy Server
To setup a Squid Proxy Server locally, you can follow the instructions available here.
Step 2 - Configuring Squid Proxy Server - updating the squid.conf file
Add the following line under the acl section
acl squid.proxy.server src appserver.wso2.com
Note: If you will not be able to start the squid server with the above config, you might have to set an /etc/hosts entry for the host appserver.wso2.com.
The following should be added before the http_access TAG
http_access allow squid.proxy.server
Note: We will be referring to this proxy server instance by the name squid.proxy.server. Hence, you need to add this entry to the /etc/hosts file which resides in your local instance as well as to the instance where the Squid server is running.
Add the following port information before the https_port TAG section
http_port 8888
Once the above is added to the squid.conf file, restart the Squid server
sudo service squid3 restart
Step 3 - Enabling the proxy configuration in WSO2 ESB
To do this, add the below configuation to the axis2.xml under the PassThroughHttpSender, PassThroughHttpSSLSender configuration
<parameter name="http.proxyHost" locked="false">squid.proxy.server</parameter> <parameter name="http.proxyPort" locked="false">8888</parameter>
Step 4 - Creating a Proxy Service
Once the above configurations are done and the WSO2 ESB server is restarted, you can create a simple Passthrough Proxy service to test the scenario.
Note that as the endpoint, I am using a backend where I'm referring to from a host name called appserver.wso2.com. This was the hostname which we added to the squid.conf file above under the acl section.
<proxy name="SSLTunnelingProxy"
transports="https http"
startOnLoad="true"
trace="disable">
<description/>
<target>
<inSequence>
<send>
<endpoint>
<address uri="https://appserver.wso2.com/services/SimpleStockQuoteService"/>
</endpoint>
</send>
</inSequence>
<outSequence>
<send/>
</outSequence>
</target>
</proxy>
Step 5 - Setting up the backend
For this scenario, you can take an WSO2 Application Server instance and start it up with ports 443 and 80 as default ports. Then, set the HostName parameter in carbon.xml to appserver.wso2.com. Deploy the SimpleStockQuoteService and you are ready to go.
Step 6 - Invoking the Proxy Service
Using a preferred client of yours you can test the scenario. If the message is sent through the Proxy server, you should see logs as shown below in /var/logs/squid/access.log file.
1493112155.126 49234 127.0.0.1 TCP_MISS/200 2335 CONNECT appserver.wso2.com:443 - HIER_DIRECT/192.168.53.176 -
1493112888.241 0 10.100.7.144 TCP_DENIED_REPLY/403 3429 CONNECT appserver.wso2.com:443 - HIER_NONE/- text/html
Step 7 - Configure authentication in Squid
To enable authentication in Squid, the following configuration needs to be done.
Add the following to the squid.conf profile under TAG: auth_param
auth_param basic program /usr/lib/squid3/ncsa_auth /etc/squid3/passwords
auth_param basic realm proxy
Note: In ubuntu 12 - the file should be ncsa_auth & in ubuntu 14 - the file is basic_ncsa_auth.
Next, under the TAG: acl add the following
acl authenticated proxy_auth REQUIRED
The following should be added under the TAG: http_access.
http_access allow authenticated
Step 8 - Setting up a user
As a pre-requisite Apache2 Utils will have to be installed.
sudo apt-get install apache2-utils
To create a new user, use the following command.
sudo htpasswd -c /etc/squid3/passwords <
When it prompts for the password, specify a password of your choice.
Reason for "PasswordInvalidAsk Password Feature is disabled" error when adding through RemoteUserStoreManager
When trying to add users from RemoteUserStoreManager it returned the following SOAP fault.
<soapenv:Envelope xmlns:soapenv="http://schemas.xmlsoap.org/soap/envelope/">
<soapenv:Body>
<soapenv:Fault>
<faultcode>soapenv:Server</faultcode>
<faultstring>PasswordInvalidAsk Password Feature is disabled</faultstring>
<detail/>
</soapenv:Fault>
</soapenv:Body>
</soapenv:Envelope>
The reason for this issue is that I have forgotten to add the element in the SOAP message. Once this element was added, I was able to successfully create the user.
<soapenv:Envelope xmlns:soapenv="http://schemas.xmlsoap.org/soap/envelope/">
<soapenv:Body>
<soapenv:Fault>
<faultcode>soapenv:Server</faultcode>
<faultstring>PasswordInvalidAsk Password Feature is disabled</faultstring>
<detail/>
</soapenv:Fault>
</soapenv:Body>
</soapenv:Envelope>
The reason for this issue is that I have forgotten to add the
Wednesday, March 29, 2017
Why doesn't my WSO2 server restart as expected when the Windows instance restarts when WSO2 server is installed as a service
When the Startup Type of a Carbon server that is configured as a Windows service is set to Manual and when the instance that the WSO2 server is running on restarts, the WSO2 Server will not get restarted along with it.
For the WSO2 server to be restarted when the Windows instance restarts, you need to set Startup Type to Automatic instead as shown below. See attachment below.

To change this setting, go to Control Panel\All Control Panel Items\Administrative Tools\Services and change the type from Manual to Automatic.
For the WSO2 server to be restarted when the Windows instance restarts, you need to set Startup Type to Automatic instead as shown below. See attachment below.

To change this setting, go to Control Panel\All Control Panel Items\Administrative Tools\Services and change the type from Manual to Automatic.
Saturday, December 10, 2016
How to configure Elasticsearch, Filebeat and Kibana to view WSO2 Carbon logs
This blog will explain the most basic steps one should follow to configure Elasticsearch, Filebeat and Kibana to view WSO2 product logs.
Download the below versions of Elasticsearch, filebeat and Kibana.
Elasticsearch - 5.1.1
Filebeat - 5.1.1
Kibana - 5.1.1
2. You can install it in any of the methods mentioned at [1].
3. Then, open up the filebeat.yml file and change the file path mentioned under filebeat.prospectors.
filebeat.prospectors:
- input_type: log
paths:
- /home/ubuntu/wso2esb-4.9.0/repository/logs/wso2carbon.log
4. Configure the output.elasticsearch and point to the server where you are running Elasticsearch.
output.elasticsearch:
hosts: ["192.168.52.99:9200"]
5. If you are using a template other that what's being used by default, you can change the configuration as below.
output.elasticsearch:
hosts: ["192.168.52.99:9200"]
template.name: "filebeat"
template.path: "filebeat.template-es2x.json"
template.overwrite: false
6. Once the above configuration are done, start your Filebeat server using the options given at [2].
2. Install Elasticsearch using the below command
sudo dpkg -i elasticsearch-5.1.1.deb
3. For the most basic scenario, you only need to configure the host by specifying the IP of the node that Elasticsearch is running on.
network.host: 192.168.52.99
4. Now start the ElasticSearch server.
sudo service elasticsearch start
2. Open the kibana.yml file and point to your Elasticsearch server.
elasticsearch.url: "http://192.168.52.99:9200"
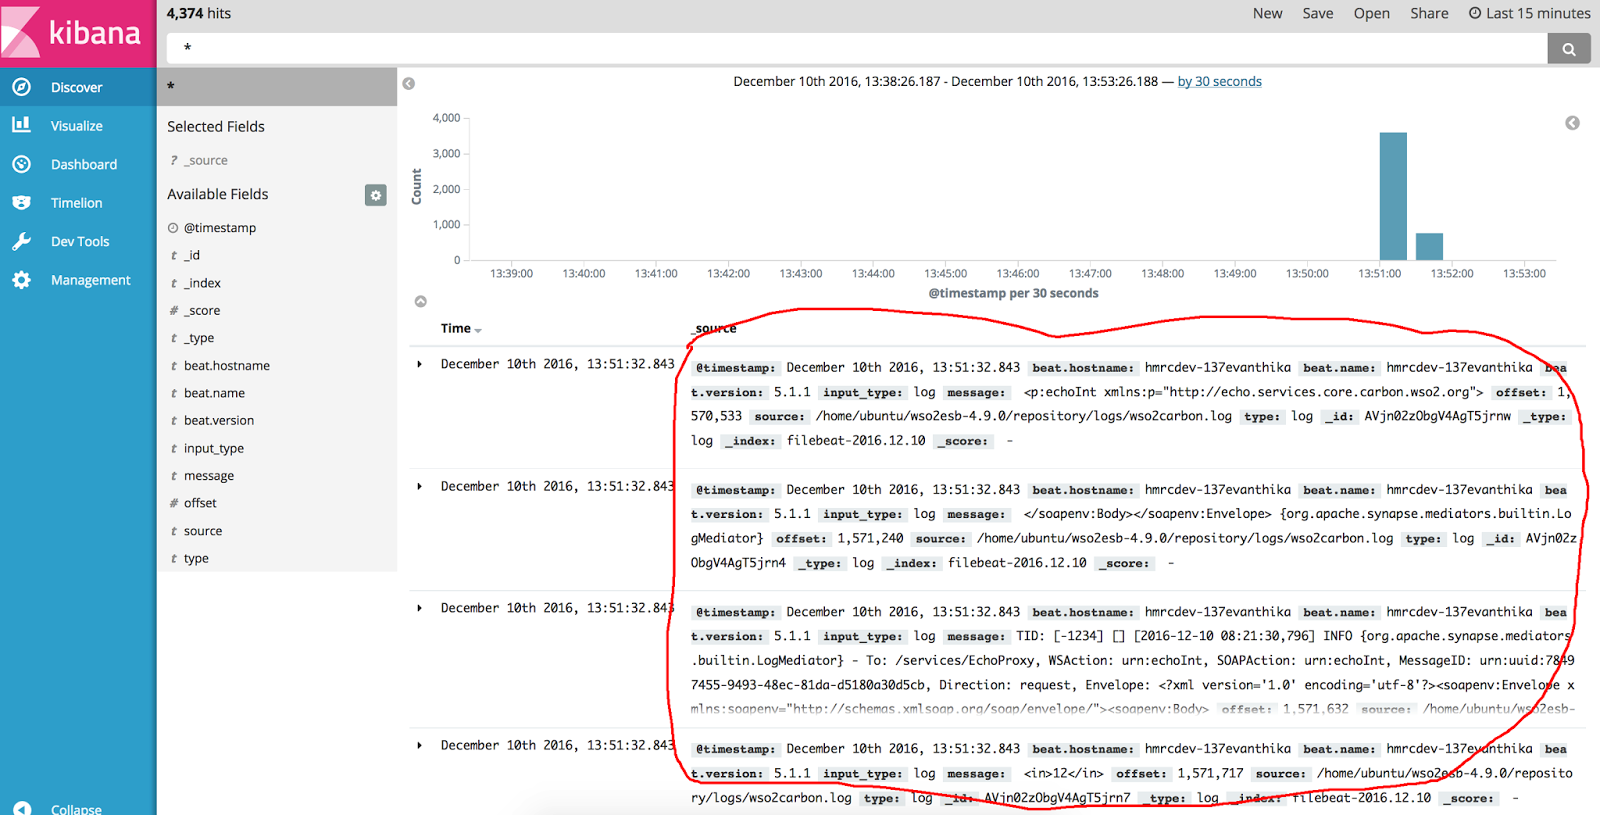
3. Access the Kibana server from the URL http://localhost:5601 and you can view the WSO2 carbon logs.

[1] - https://www.elastic.co/guide/en/beats/filebeat/5.x/filebeat-installation.html
[2] - https://www.elastic.co/guide/en/beats/filebeat/5.x/filebeat-starting.html
Pre-requisites
I have written this document assuming that we are using the below product versions.Download the below versions of Elasticsearch, filebeat and Kibana.
Elasticsearch - 5.1.1
Filebeat - 5.1.1
Kibana - 5.1.1
How to configure Filebeat
1. Download Filebeat to the server where you Carbon Product is running.2. You can install it in any of the methods mentioned at [1].
3. Then, open up the filebeat.yml file and change the file path mentioned under filebeat.prospectors.
filebeat.prospectors:
- input_type: log
paths:
- /home/ubuntu/wso2esb-4.9.0/repository/logs/wso2carbon.log
4. Configure the output.elasticsearch and point to the server where you are running Elasticsearch.
output.elasticsearch:
hosts: ["192.168.52.99:9200"]
5. If you are using a template other that what's being used by default, you can change the configuration as below.
output.elasticsearch:
hosts: ["192.168.52.99:9200"]
template.name: "filebeat"
template.path: "filebeat.template-es2x.json"
template.overwrite: false
6. Once the above configuration are done, start your Filebeat server using the options given at [2].
Configuring ElasticSearch
1. For better performance, it is requested to use Elasticsearch on JDK 1.8. Hence, as the first step, make sure you install JDK 1.8.0 on your machine before continuing with the rest of the steps mentioned here.2. Install Elasticsearch using the below command
sudo dpkg -i elasticsearch-5.1.1.deb
3. For the most basic scenario, you only need to configure the host by specifying the IP of the node that Elasticsearch is running on.
network.host: 192.168.52.99
4. Now start the ElasticSearch server.
sudo service elasticsearch start
Viewing the logs from Kibana
1. Extract Kibana to a preferred location.2. Open the kibana.yml file and point to your Elasticsearch server.
elasticsearch.url: "http://192.168.52.99:9200"
3. Access the Kibana server from the URL http://localhost:5601 and you can view the WSO2 carbon logs.
[1] - https://www.elastic.co/guide/en/beats/filebeat/5.x/filebeat-installation.html
[2] - https://www.elastic.co/guide/en/beats/filebeat/5.x/filebeat-starting.html
Tuesday, December 6, 2016
How to access an ActiveMQ queue from WSO2 ESB which is secured with a username/password
By default, a queue in ActiveMQ can be accessed without providing any credentials. However, in real world scenarios, you will have to deal with secured queues. So in this blog, I will explain how we can enable security for ActiveMQ and what configurations are required to be done in WSO2 ESB.
Pr-requisites - Enable the JMS transport for WSO2 ESB as explained in [1].
Step 1 - Secure the ActiveMQ instance with credentials.
To do this, add the below configuration to the activemq.xml under the <broker> tag and start the server.
<plugins>
<simpleAuthenticationPlugin anonymousAccessAllowed="true">
<users>
<authenticationUser username="system" password="system" groups="users,admins"/>
<authenticationUser username="admin" password="admin" groups="users,admins"/>
<authenticationUser username="user" password="user" groups="users"/>
<authenticationUser username="guest" password="guest" groups="guests"/>
</users>
</simpleAuthenticationPlugin>
</plugins>
Step 2 - Enable the JMS Listener configuration and configure it as shown below.
<!--Uncomment this and configure as appropriate for JMS transport support, after setting up your JMS environment (e.g. ActiveMQ)-->
<transportReceiver name="jms" class="org.apache.axis2.transport.jms.JMSListener">
<parameter name="myTopicConnectionFactory" locked="false">
<parameter name="java.naming.factory.initial" locked="false">org.apache.activemq.jndi.ActiveMQInitialContextFactory</parameter>
<parameter name="java.naming.provider.url" locked="false">tcp://localhost:61616</parameter>
<parameter name="java.naming.security.principal" locked="false">admin</parameter>
<parameter name="java.naming.security.credentials" locked="false">admin</parameter>
<parameter locked="false" name="transport.jms.UserName">admin</parameter>
<parameter locked="false" name="transport.jms.Password">admin</parameter>
<parameter name="transport.jms.ConnectionFactoryJNDIName" locked="false">TopicConnectionFactory</parameter>
<parameter name="transport.jms.ConnectionFactoryType" locked="false">topic</parameter>
</parameter>
<parameter name="myQueueConnectionFactory" locked="false">
<parameter name="java.naming.factory.initial" locked="false">org.apache.activemq.jndi.ActiveMQInitialContextFactory</parameter>
<parameter name="java.naming.provider.url" locked="false">tcp://localhost:61616</parameter>
<parameter name="java.naming.security.principal" locked="false">admin</parameter>
<parameter name="java.naming.security.credentials" locked="false">admin</parameter>
<parameter locked="false" name="transport.jms.UserName">admin</parameter>
<parameter locked="false" name="transport.jms.Password">admin</parameter>
<parameter name="transport.jms.ConnectionFactoryJNDIName" locked="false">QueueConnectionFactory</parameter>
<parameter name="transport.jms.ConnectionFactoryType" locked="false">queue</parameter>
</parameter>
<parameter name="default" locked="false">
<parameter name="java.naming.factory.initial" locked="false">org.apache.activemq.jndi.ActiveMQInitialContextFactory</parameter>
<parameter name="java.naming.provider.url" locked="false">tcp://localhost:61616</parameter>
<parameter name="java.naming.security.principal" locked="false">admin</parameter>
<parameter name="java.naming.security.credentials" locked="false">admin</parameter>
<parameter locked="false" name="transport.jms.UserName">admin</parameter>
<parameter locked="false" name="transport.jms.Password">admin</parameter>
<parameter name="transport.jms.ConnectionFactoryJNDIName" locked="false">QueueConnectionFactory</parameter>
<parameter name="transport.jms.ConnectionFactoryType" locked="false">queue</parameter>
</parameter>
</transportReceiver>
Step 3 - Create a Proxy service to listen to a JMS queue in ActiveMQ.
Once the ESB server is started, create the below Proxy service and let it listen to the queue generated in ActiveMQ.
<proxy name="StockQuoteProxy1" transports="jms" startOnLoad="true">
<target>
<endpoint>
<address uri="http://localhost:9000/services/SimpleStockQuoteService"/>
</endpoint>
<inSequence>
<property name="OUT_ONLY" value="true"/>
</inSequence>
<outSequence>
<send/>
</outSequence>
</target>
<publishWSDL uri="file:repository/samples/resources/proxy/sample_proxy_1.wsdl"/>
<parameter name="transport.jms.ContentType">
<rules>
<jmsProperty>contentType</jmsProperty>
<default>application/xml</default>
</rules>
</parameter>
</proxy>
Once the above proxy service is deployed, send a request to the queue and observe how the message is processed and send to the backend. You can use the sample available in [2] to test this scenario out.
If you are sending a JMS request you can use the username and the password in the URL as shown below.
ant stockquote -Dmode=placeorder -Dtrpurl="jms:/StockQuoteProxy1?transport.jms.DestinationType=queue&transport.jms.ContentTypeProperty=contentType&java.naming.provider.url=tcp://localhost:61616&java.naming.factory.initial=org.apache.activemq.jndi.ActiveMQInitialContextFactory&transport.jms.UserName="admin"&transport.jms.Password="admin"&transport.jms.ConnectionFactoryType=queue&transport.jms.ConnectionFactoryJNDIName=QueueConnectionFactory"
[1] - https://docs.wso2.com/display/ESB490/Configure+with+ActiveMQ
[2] - https://docs.wso2.com/display/ESB490/Sample+250%3A+Introduction+to+Switching+Transports
Pr-requisites - Enable the JMS transport for WSO2 ESB as explained in [1].
Step 1 - Secure the ActiveMQ instance with credentials.
To do this, add the below configuration to the activemq.xml under the <broker> tag and start the server.
<plugins>
<simpleAuthenticationPlugin anonymousAccessAllowed="true">
<users>
<authenticationUser username="system" password="system" groups="users,admins"/>
<authenticationUser username="admin" password="admin" groups="users,admins"/>
<authenticationUser username="user" password="user" groups="users"/>
<authenticationUser username="guest" password="guest" groups="guests"/>
</users>
</simpleAuthenticationPlugin>
</plugins>
Step 2 - Enable the JMS Listener configuration and configure it as shown below.
<!--Uncomment this and configure as appropriate for JMS transport support, after setting up your JMS environment (e.g. ActiveMQ)-->
<transportReceiver name="jms" class="org.apache.axis2.transport.jms.JMSListener">
<parameter name="myTopicConnectionFactory" locked="false">
<parameter name="java.naming.factory.initial" locked="false">org.apache.activemq.jndi.ActiveMQInitialContextFactory</parameter>
<parameter name="java.naming.provider.url" locked="false">tcp://localhost:61616</parameter>
<parameter name="java.naming.security.principal" locked="false">admin</parameter>
<parameter name="java.naming.security.credentials" locked="false">admin</parameter>
<parameter locked="false" name="transport.jms.UserName">admin</parameter>
<parameter locked="false" name="transport.jms.Password">admin</parameter>
<parameter name="transport.jms.ConnectionFactoryJNDIName" locked="false">TopicConnectionFactory</parameter>
<parameter name="transport.jms.ConnectionFactoryType" locked="false">topic</parameter>
</parameter>
<parameter name="myQueueConnectionFactory" locked="false">
<parameter name="java.naming.factory.initial" locked="false">org.apache.activemq.jndi.ActiveMQInitialContextFactory</parameter>
<parameter name="java.naming.provider.url" locked="false">tcp://localhost:61616</parameter>
<parameter name="java.naming.security.principal" locked="false">admin</parameter>
<parameter name="java.naming.security.credentials" locked="false">admin</parameter>
<parameter locked="false" name="transport.jms.UserName">admin</parameter>
<parameter locked="false" name="transport.jms.Password">admin</parameter>
<parameter name="transport.jms.ConnectionFactoryJNDIName" locked="false">QueueConnectionFactory</parameter>
<parameter name="transport.jms.ConnectionFactoryType" locked="false">queue</parameter>
</parameter>
<parameter name="default" locked="false">
<parameter name="java.naming.factory.initial" locked="false">org.apache.activemq.jndi.ActiveMQInitialContextFactory</parameter>
<parameter name="java.naming.provider.url" locked="false">tcp://localhost:61616</parameter>
<parameter name="java.naming.security.principal" locked="false">admin</parameter>
<parameter name="java.naming.security.credentials" locked="false">admin</parameter>
<parameter locked="false" name="transport.jms.UserName">admin</parameter>
<parameter locked="false" name="transport.jms.Password">admin</parameter>
<parameter name="transport.jms.ConnectionFactoryJNDIName" locked="false">QueueConnectionFactory</parameter>
<parameter name="transport.jms.ConnectionFactoryType" locked="false">queue</parameter>
</parameter>
</transportReceiver>
Step 3 - Create a Proxy service to listen to a JMS queue in ActiveMQ.
Once the ESB server is started, create the below Proxy service and let it listen to the queue generated in ActiveMQ.
<proxy name="StockQuoteProxy1" transports="jms" startOnLoad="true">
<target>
<endpoint>
<address uri="http://localhost:9000/services/SimpleStockQuoteService"/>
</endpoint>
<inSequence>
<property name="OUT_ONLY" value="true"/>
</inSequence>
<outSequence>
<send/>
</outSequence>
</target>
<publishWSDL uri="file:repository/samples/resources/proxy/sample_proxy_1.wsdl"/>
<parameter name="transport.jms.ContentType">
<rules>
<jmsProperty>contentType</jmsProperty>
<default>application/xml</default>
</rules>
</parameter>
</proxy>
Once the above proxy service is deployed, send a request to the queue and observe how the message is processed and send to the backend. You can use the sample available in [2] to test this scenario out.
If you are sending a JMS request you can use the username and the password in the URL as shown below.
ant stockquote -Dmode=placeorder -Dtrpurl="jms:/StockQuoteProxy1?transport.jms.DestinationType=queue&transport.jms.ContentTypeProperty=contentType&java.naming.provider.url=tcp://localhost:61616&java.naming.factory.initial=org.apache.activemq.jndi.ActiveMQInitialContextFactory&transport.jms.UserName="admin"&transport.jms.Password="admin"&transport.jms.ConnectionFactoryType=queue&transport.jms.ConnectionFactoryJNDIName=QueueConnectionFactory"
[1] - https://docs.wso2.com/display/ESB490/Configure+with+ActiveMQ
[2] - https://docs.wso2.com/display/ESB490/Sample+250%3A+Introduction+to+Switching+Transports
Friday, November 25, 2016
Disabling API Console/Swagger tools menu available from store console for anonymous/logged in users
If you need to disable the API Console/Swagger from the Store UI for anonymous users/logged in users, you can try out the below methods.
There is no straightforward configuration readily available with API Manager to do this. However, by doing a minor config change, this is possible. What you actually need to do is change the code of the block.jag which resides under wso2am-1.8.0/repository/deployment/server/jaggeryapps/store/site/blocks/api/api-info folder.
Method 1
Assuming you want the API Console (RESTClient) to be disable for anonymous users only, this can be done by changing/adding the below lines of code to the block.jag.
Step 1
Change the below code of line from
var showConsole=true;
to
var showConsole=false;
Step 2
Then add the below lines of code right after the line _var showConsole=false;_
if(user){
showConsole=true
}
Method 2
If you need this feature to be completely invisible for anonymous and logged in users, all you have to do is change the below code.
Change the parameter from
var showConsole=true;
to
var showConsole=false;
Once the above changes are done, restart the API manager server and you will notice that the RESTClient tool is visible only to logged in users/not visible at all for anyone.
There is no straightforward configuration readily available with API Manager to do this. However, by doing a minor config change, this is possible. What you actually need to do is change the code of the block.jag which resides under wso2am-1.8.0/repository/deployment/server/jaggeryapps/store/site/blocks/api/api-info folder.
Method 1
Assuming you want the API Console (RESTClient) to be disable for anonymous users only, this can be done by changing/adding the below lines of code to the block.jag.
Step 1
Change the below code of line from
var showConsole=true;
to
var showConsole=false;
Step 2
Then add the below lines of code right after the line _var showConsole=false;_
if(user){
showConsole=true
}
Method 2
If you need this feature to be completely invisible for anonymous and logged in users, all you have to do is change the below code.
Change the parameter from
var showConsole=true;
to
var showConsole=false;
Once the above changes are done, restart the API manager server and you will notice that the RESTClient tool is visible only to logged in users/not visible at all for anyone.
Subscribe to:
Posts (Atom)